Ubuntu Server unattended installation with dynamic partitioning: a deep dive
Thu 31 August 2023Introduction
Ubuntu Server installer features an automated installation, sometimes called "unattended", that let you script part or entirety of the installation process. The immediate use-case is to write the installation procedure once, and then install many computers: very handy when you want to have a reproducible installation, an homogenous parc of machines, etc.
The auto-installer itself is fairly well documented. However, the more you dig into the documentation, the more you realize several important elements are not explained well or left to the experienced users/(sys-)admins.
Dynamic partitioning of the disks is one of those missing pieces, where I emphasize the word dynamic: one can see the dynamic partitioning as a function taking the current disk setup as an input, and creating a new partitioning as output, indicating in the meantime where to install Ubuntu.
All examples I've seen from Ubuntu Server unattended installer assume either that "it is ok" to erase the whole disk, or that we have an extremely precise information about each existing partition we want to keep (location, order, type, serial, size to the byte precision, etc). Failing to meet this precision will fail the whole installation. This makes Ubuntu unattended installation quite difficult in various scenarios, such as the one where we want to preserve existing partition.
If the autoinstall YAML file has to manually be adapted for each configuration, then this is not an autoinstall anymore.
A little digression: concerning the first assumption that "it is ok" to erase the whole disk, it hints the current focus of Canonical to make the predominant use case of Ubuntu Server as an OS of choice in a virtualized context (cloud and such). But this leaves behind various institutions having a park of eg. workstations with several co-existing OSes.
What is the scenario I am covering here?
I want something simple enough that follows those steps:
- here is the hard drive, it has partitions in it: don't touch!
- you can start installing from there (free space after last partition)
- you may reuse some boot partition (UEFI)
Let's say I have a dozen of PCs - for a school for instance - and I've already installed Windows on those. I now want to install Ubuntu on top and make them all dual boot. Those are real PCs (not VMs) and I really want dual boot because there are tools in the two OSes I need to teach about. Yes, this is a real use case and I am not inventing anything here.
Windows comes with an auto-installation facility of its own, pretty powerful and used by many tools and ITs for decades. The problem is however that, if there is any other OS on the computer first (such as Ubuntu), installing Windows so that dual-boot works is difficult and likely to break the other OSes. To simplify, we assume to work only on Ubuntu's installer:
you have a computer with several partitions already: now you want to install Ubuntu, and you want the Ubuntu installer to behave and proceed easily with the installation without breaking any prior installed OS, and so that you can just do something else while installing.
The scenario I am describing does not really care about the size in bytes of the existing partitions, nor the way those were formatted. In particular even an auto-installation can yield partitions of various size when the hardware is not homogeneous (think "use 30% of the disk, cap it at 30GB" kind of things).
Why Ubuntu server?
We deal only with Ubuntu Server: why?
This will be quick: Ubuntu Desktop comes with something called Ubuntu Live that lets you try Ubuntu before installing it on your computer. We suppose we know Ubuntu enough here and do not need to try it first. Ubuntu Live does not feature the autoinstall, which is supported only on Ubuntu Server.
On top of that, an Ubuntu Desktop installation is just a few packages away from Ubuntu Server, and we can have a full Desktop after the completion of the Server installation.
What's in this article?
We will first quickly introduce the various components of the installer that are relevant to us. We will then describe the general idea for injecting a dynamic behavior to the installation process, how to make it work on a virtual machine and then on a real one. Finally discuss about various things such as UEFI, debugging tips and accelerating the workflow.
What we will also see is various tools for checking/experimenting the installation of Ubuntu Server in a virtual machine such as VirtualBox and how to make the development cycle more efficient.
Description of the auto-installation infrastructure
Installing an operating system may seem simple on the outside, but requires several tools agreeing and communicating. The profusion of the tools makes it difficult to tweak the process, if only to read the documentation. For instance, how do I indicate that a file should be read from a local/remote server, and which is the component that is responsible for that?
In order to bring a bit of clarity on this, I thought it would be a good idea to describe what are the components involved.
Ubuntu Server supportsautoinstallation since 20.04 and uses a tool called subiquity for it: subiquity means "ubiquity for servers", where Ubiquity is more or less Ubuntu Desktop's installer since some time now.
subiquity expects a file called user-data with YAML syntax, as well as a (possibly empty) meta-data file: they both describe the installation. By describing, you can think of user-data as a domain specific declarative language for describing the state of the operating system at the end of the installation. The state here encompasses the partitions, the packages, the users/passwords, etc. anything that you can do with Ubuntu. In nature, the language used leaves little room for conditional steps or dynamic behavior, if not handled by the primitives of the language itself already.
So far so good.
Things getting confusing ...
Because subiquity is not reinventing the wheel, there are 2 other tools that you have to be aware of for understanding the installation steps and the format of the user-data:
curtin: a tool for describing how the OS should be installed on the computer. In particular,subiquityuses a superset of the syntax borrowed fromcurtinfor some of its sections. Here you specify for instance the partitions or the storage layout (lvm/ standard, etc). Thecurtindocumentation will be used as reference for the syntax of specific sections of theuser-datafile, mainly partitioning.cloud-init: an industry standard provisioning mechanism. This tool more or less orchestrates the installation: it can for instance get theuser-datafrom various sources, runcurtin/subiquityand wait for its completion (base installation to disk), and then configure further the OS with users & ssh key, setting the hostname, etc
I personally don't understand in details how cloud-init and subiquity interact, for instance the late-commands exists in subiquity, but not in cloud-init, and there is a late_command in curtin.
Let's keep it simple:
curtin,subiquityandcloud-inithave an overlap in their features,- there are some facilities of
cloud-initwe can use to pass various options to the installer.cloud-initis used as bootstrapping forsubiquity.
Proposed solution
The solution proposed here is to modify the our installation YAML file, in place, before the disk partitioning takes place. This can be done through the setting of the key early-commands in the autoinstall script:
- the
early-commandsare read "early" enough during the installation procedure - most importantly, the file containing the
autoinstallis read again from disk after theearly-commandshave successfully ran.
This mechanism during the installation let us rewrite completely the user-data dynamically, and we will use it to discover the existing partitions and add the ones we want to install Ubuntu to.
Here is some almost ASCII art for setting up the basic idea:
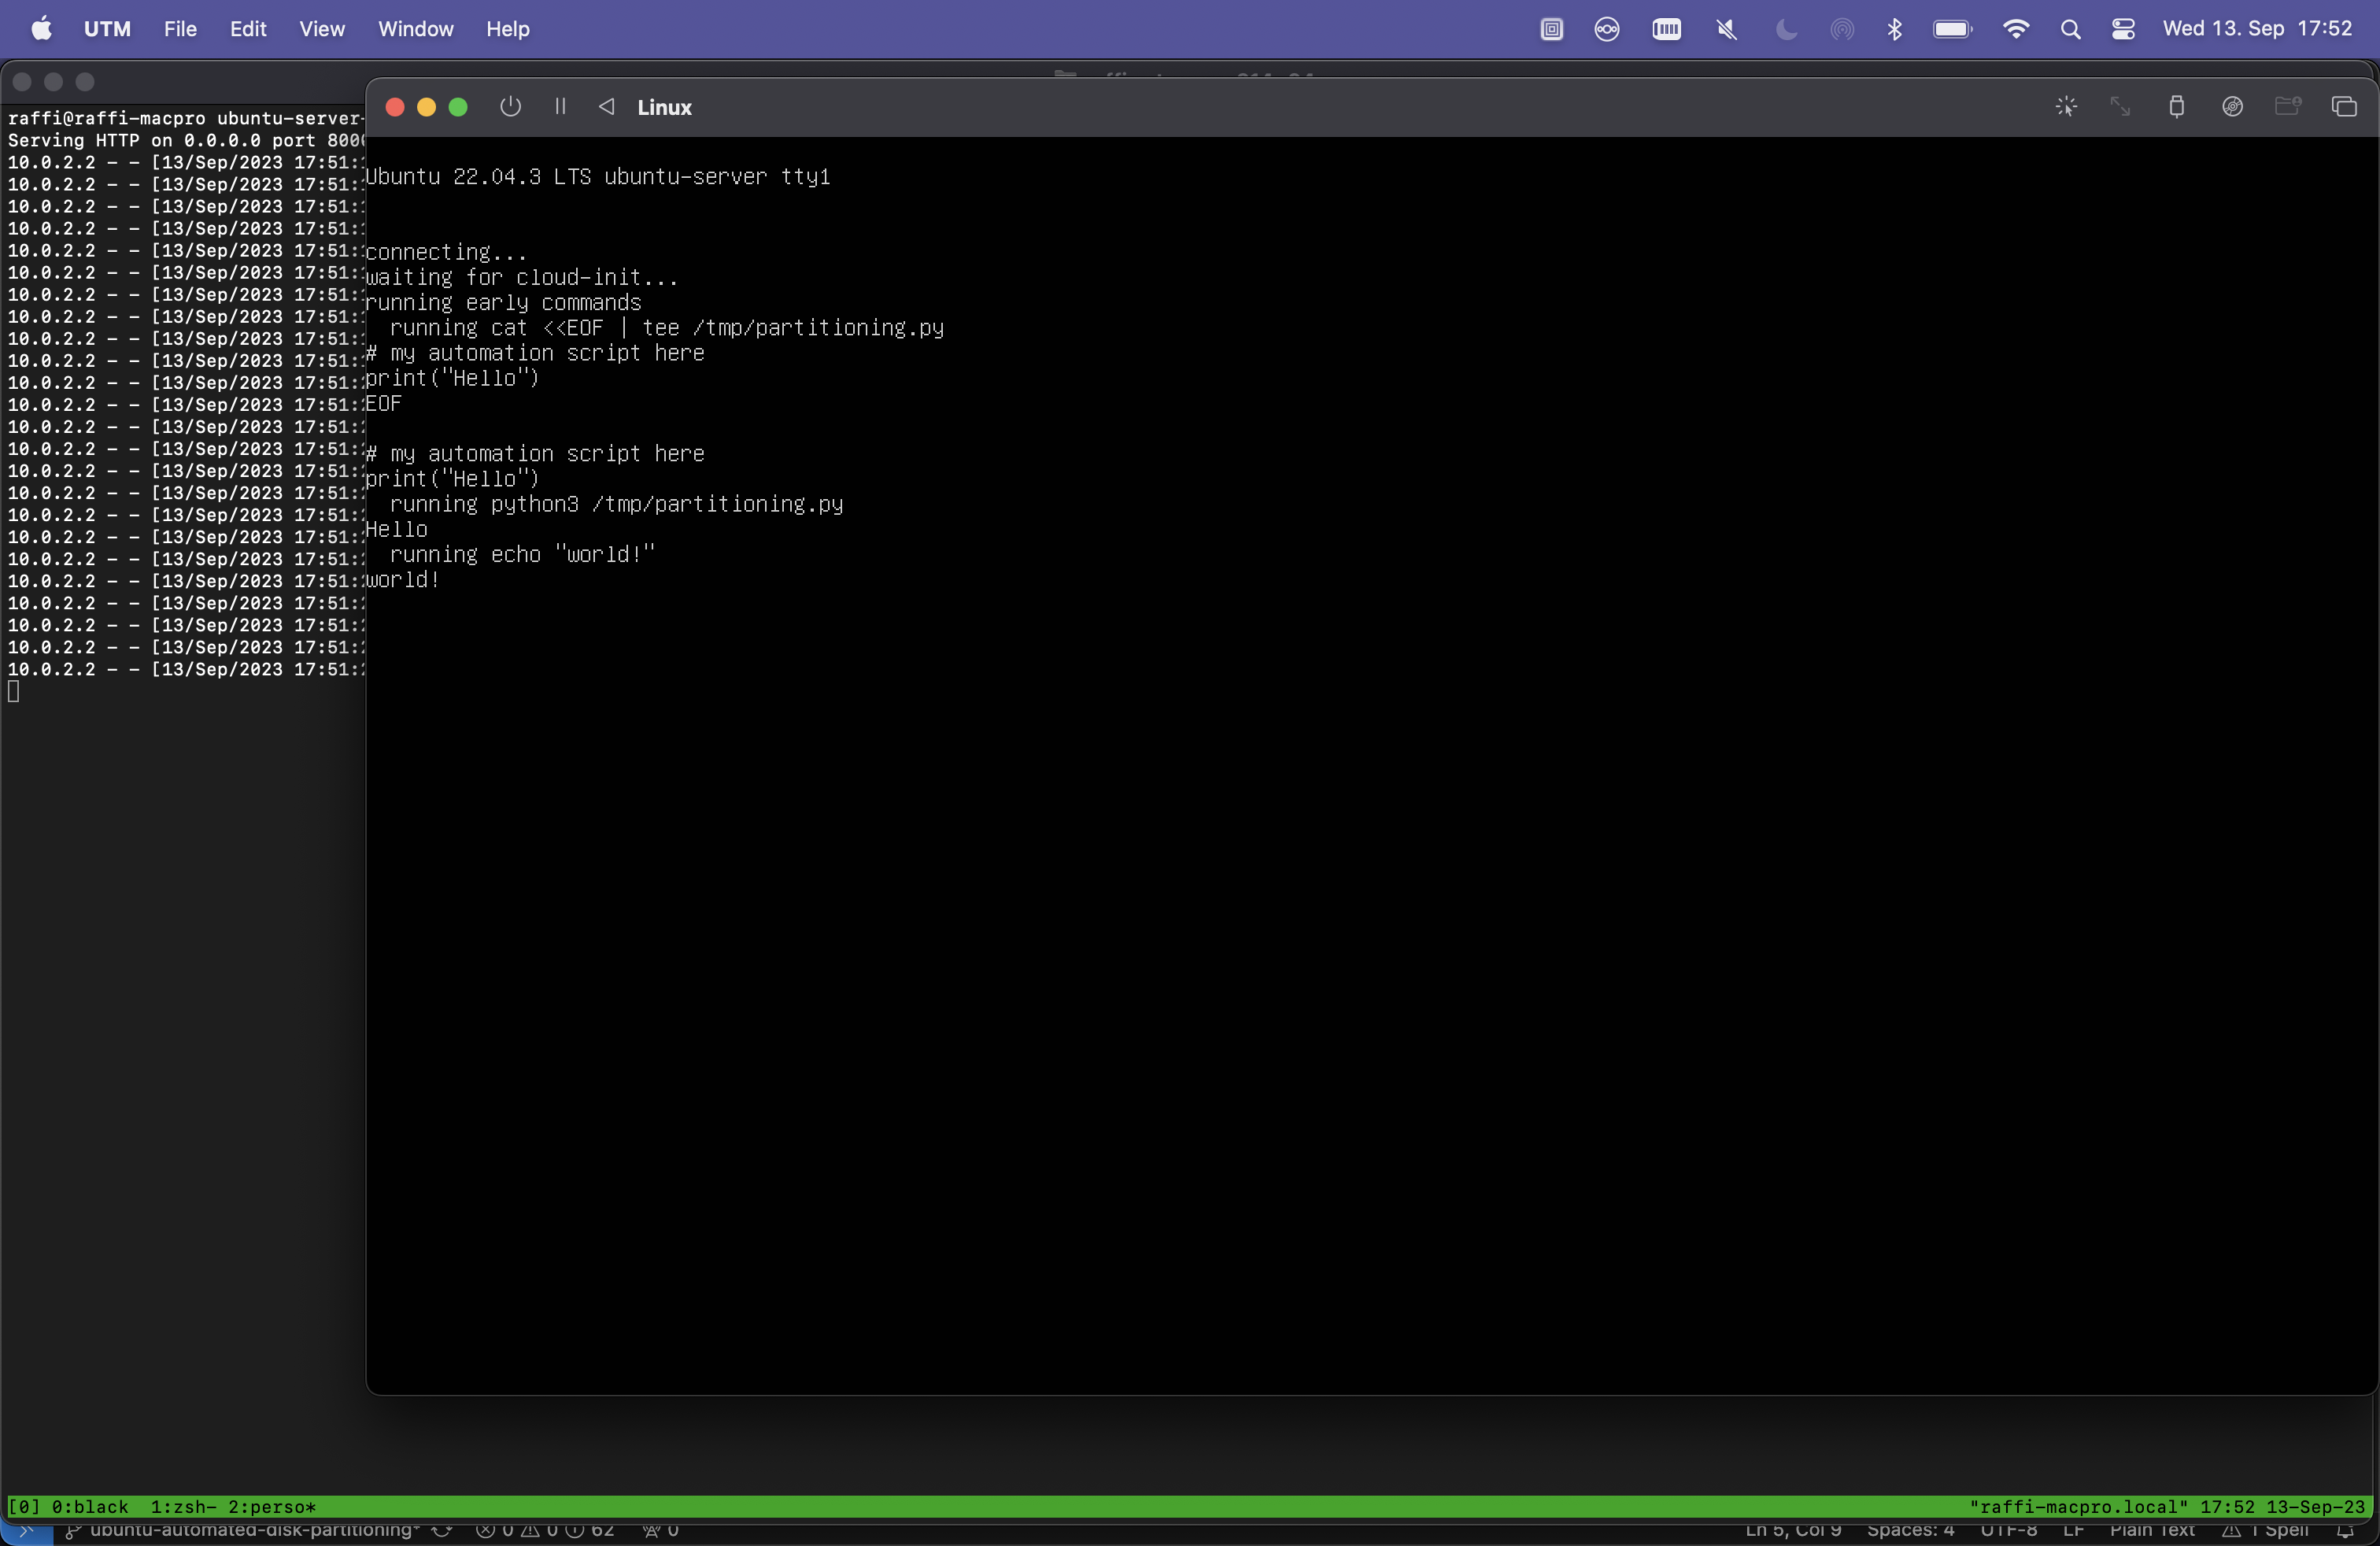
The early-command section looks like this and we can execute there whatever we want/need. A minimal early-command would be simply:
#cloud-config
autoinstall:
  version: 1

  # ....

  early-commands:
  - |
    cat <<EOF | tee /tmp/partitioning.py
    # my automation script here
    print("Hello")
    EOF

  - python3 /tmp/partitioning.py
  - echo "world!"
This configuration is here only to demonstrate how we will achieve the dynamic partitioning setup:
- first we flush the actual script into a file
/tmp/partitioning.py: the script is a multilinepython, usescatandtee, and ends with theEOF(forcat/teeto work). I am not inventing anything here, this is basicbashtype scripting. - then we actually execute
/tmp/partitioning.pyby callingpython: it just printsHello - finally, we echo
world!just to see that things work as expected.
We are just doing dummy things to make sure that we got it working ok and, as you'll see below, this will also gives us a chance to test our development cycle.
notes:
- the YAML file is fully self-contained, a property which is very handy when developing. We will see later how to inject complicated and long scripts automatically into the YAML file, to keep that property,
- on
subiquity(see this section), we already havepython3+(maybe not the latestpython3language and library features) andpyyamlcomes from free as well. If we stay with basicpythonand do not involve external packages, no need for network,pipor any installation during that step.
We have enough material to start playing, and the best playground for OS installations is actually virtual machines. Let's see what we can do, and more.
Step by step development in a virtual machine
Creating an automated installation may take quite some time and effort and, I would like to emphasize this, being myself a developer since some time now: not having a proper development environment will ultimately led to a non fully satisfactory solution. Equipping ourselves with the proper tooling quite important, even more so as the trial/error cycle takes some time (OS installation).
I hope you are convinced that developing the auto-installer within a virtual machine is the right thing to do now.
Virtualization tools and automation
We have several options there:
- Virtual Box which is a popular and free, open source and (almost) cross platform
qemuwhich is widely available but complicatedUTMon macOS, a very good front-end toqemuVMware fusion(available after a free registration) which is in my opinion the most performant but does not let you tweak it much for the automation we need.
One of the most appealing feature in a VM manager like VirtualBox is the possibility to create snapshots, which we use to revert quickly to a previous clean and known state of the machine: this state will be our "hypothetical" clean Windows installation, and we will check the auto-installer is not deleting anything there.
We are not actually going to install Windows, we just need a bunch of partitions and check that they are still there after our Ubuntu autoinstall is complete.
Initial configuration
In order to ensure the partitioning is running smoothly, we will create a VM with an initial disk configuration: the installation of Ubuntu should not modify the partitions. For creating this initial configuration, one possibility is to use the free graphical tool Gparted Live CD with which we can start the VM.
On the screenshots below, I created an empty VM with 20GB hard drive space, and booted using GParted live ISO. I then created the following partitions:
- first partition 300M FAT32 marked as
esd(flag after partition creation, see pictures below) - second about 500M
ntfs - third about 300M,
ntfs
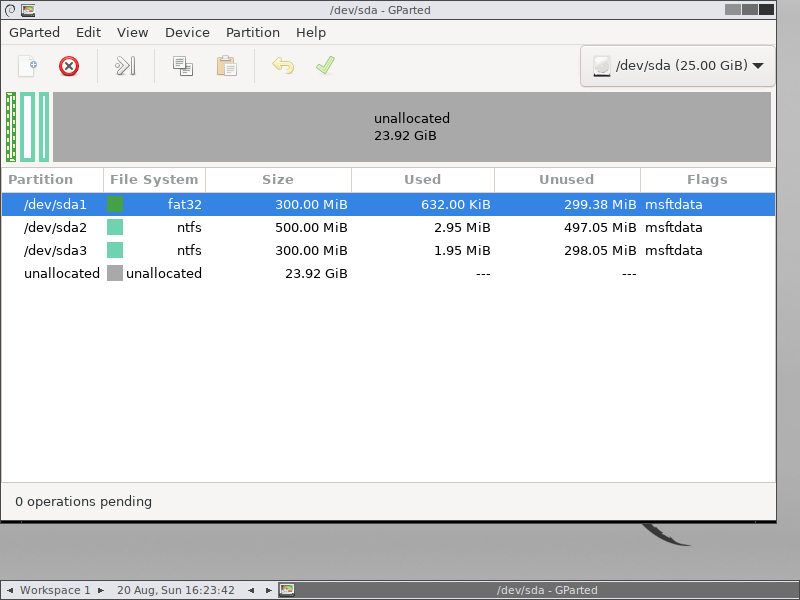
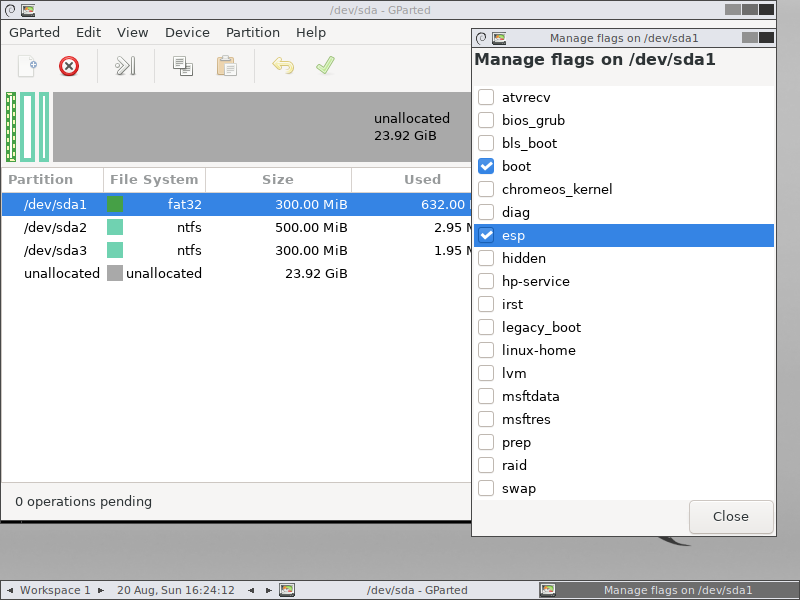
This is close enough to what the Windows installer does, only the system is absent. The first partition is used for UEFI boot, and it is important to set the flag afterwards. Even in non-UEFI settings, the BIOS will look for the partition marked with boot (implied by esd).
Finally I shut down the machine and create a snapshot I name part1:
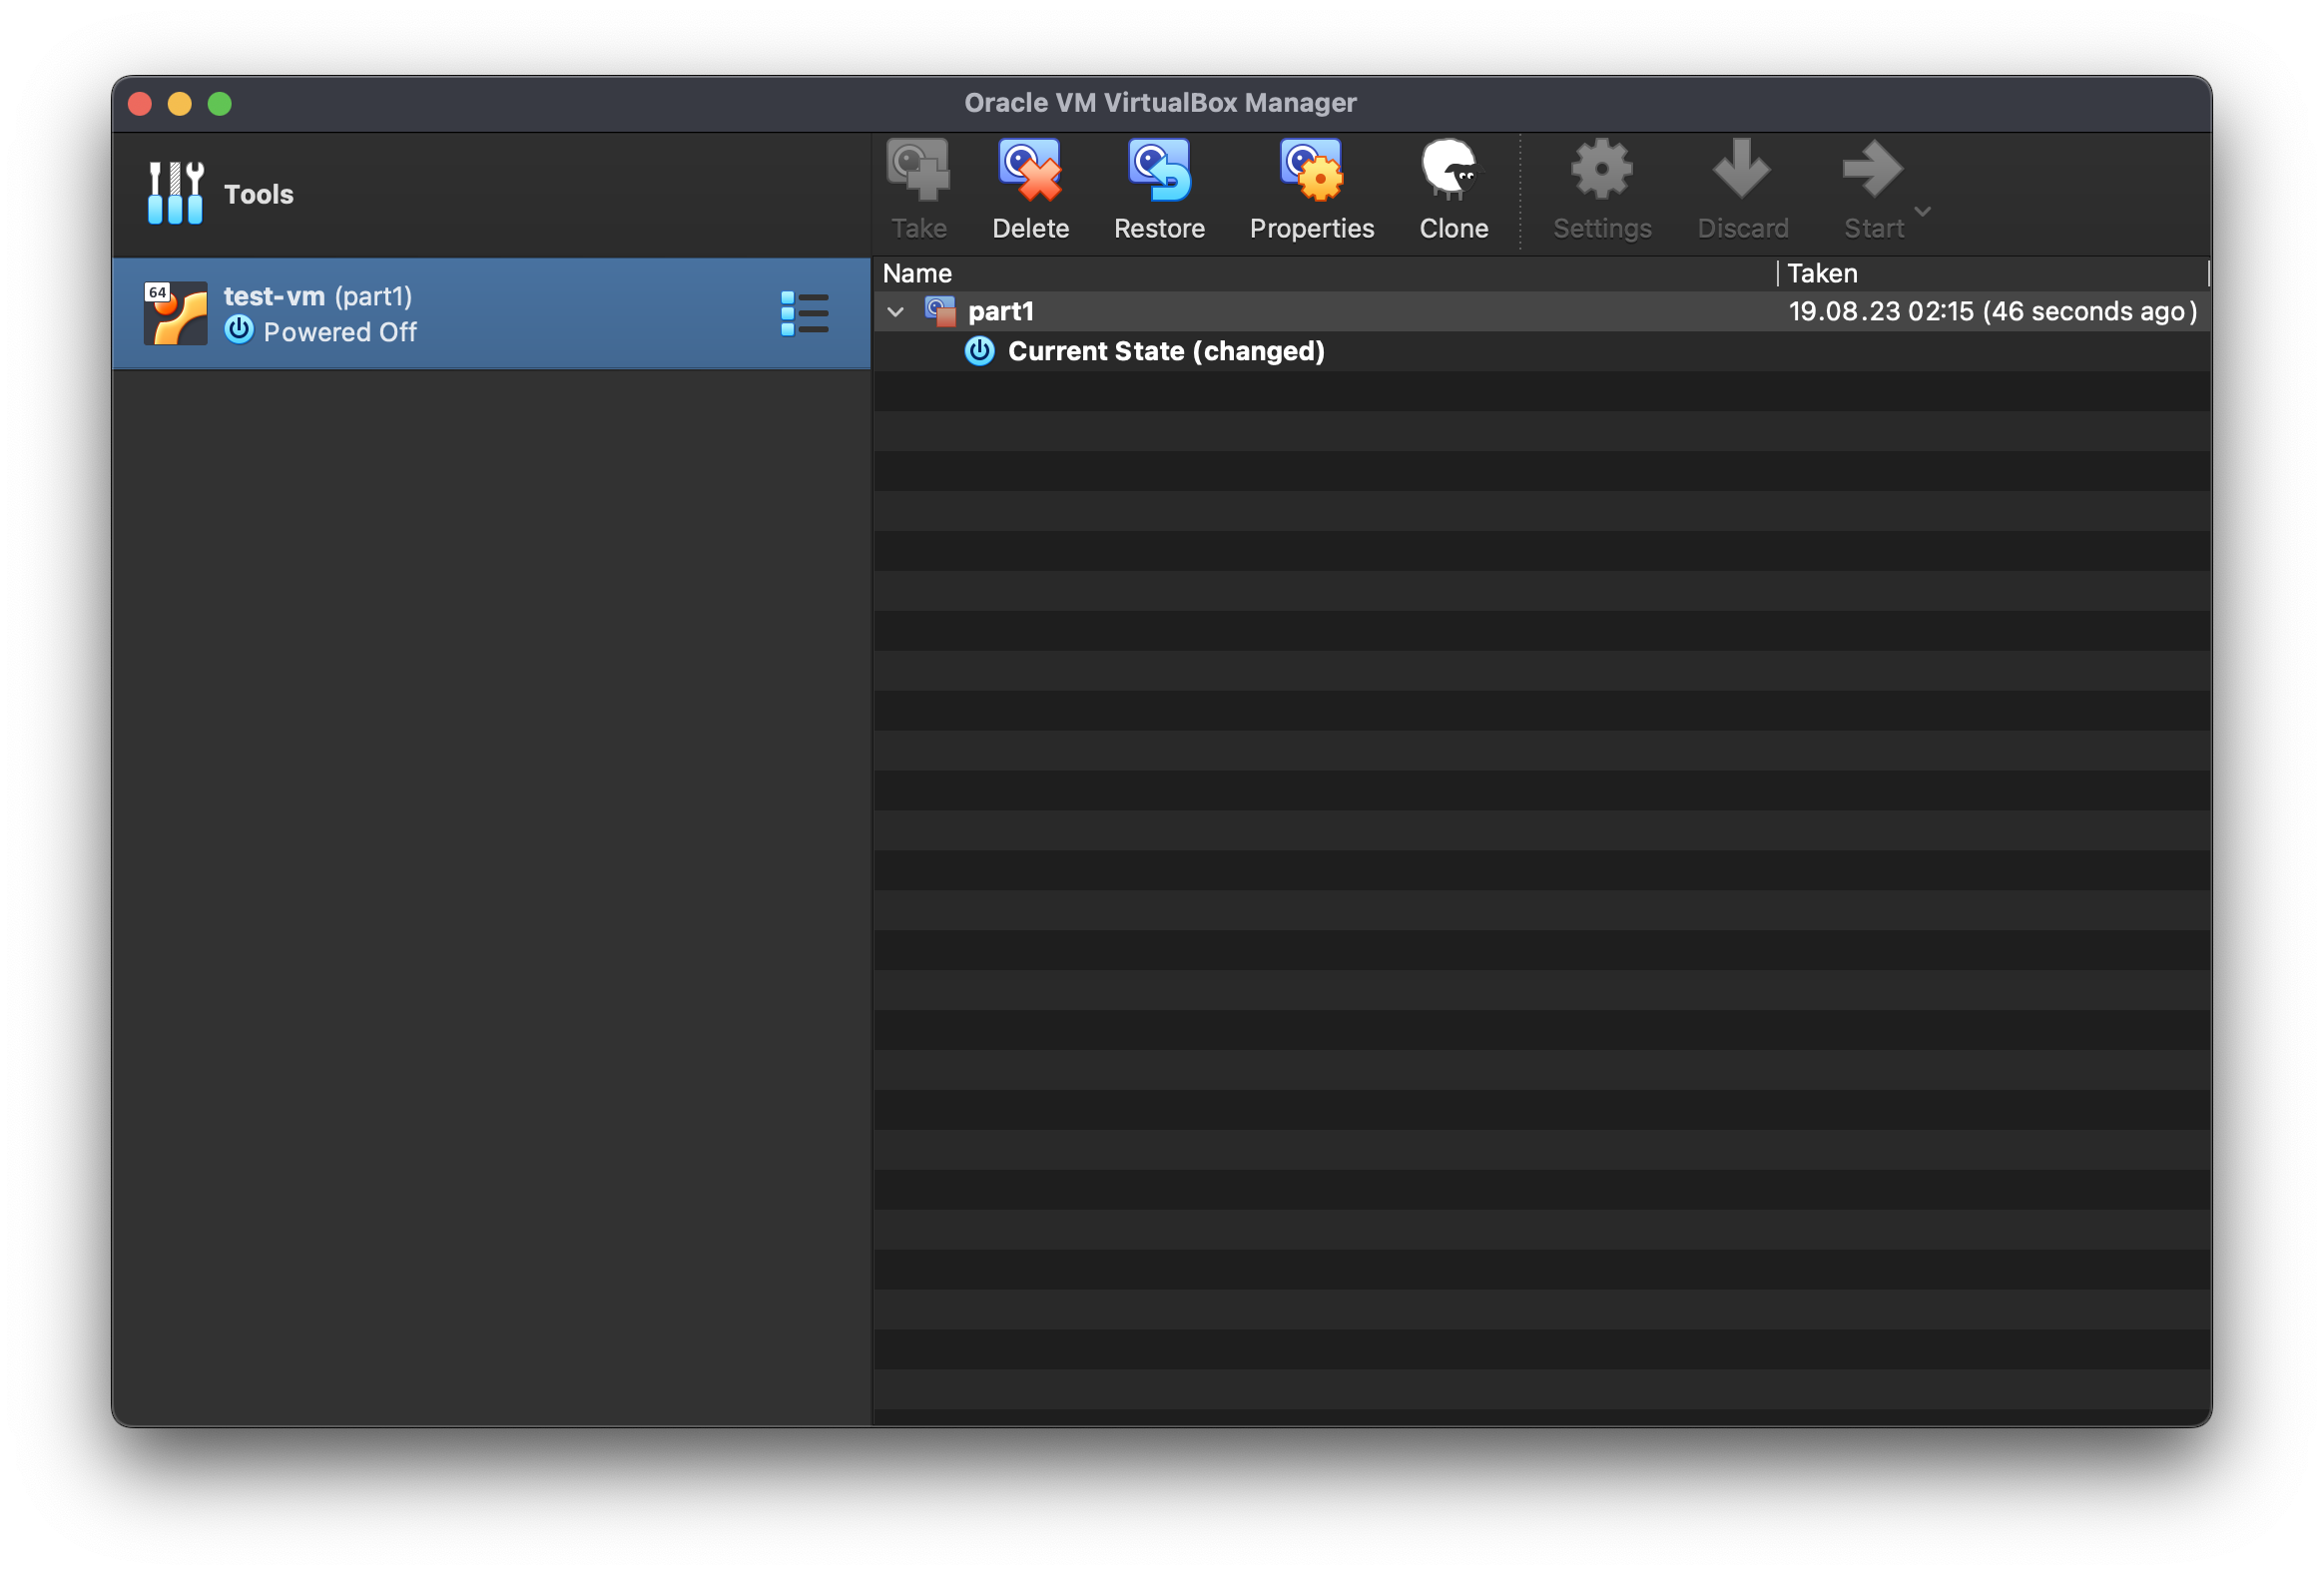
note if for some reason you do not have GParted for your architecture (eg. unavailable on Apple Silicon), you can always boot with the Ubuntu installer, drop into a shell (type F2 or in the Help menu) before performing the installation, and create the above partition using parted, example:
parted /dev/nvme0n1
unit MiB
mktable gpt
mkpart primary fat32 1 300
mkpart primary ntfs 301 800
mkpart primary ntfs 801 1100
set 1 esp on
print
We are good to go with the unattended installation.
Running the unattended installer under a VM
At this point, we need to download the Ubuntu Server ISO installer from Canonical website, and we will first check that we are able to boot it with the autoinstaller.
This is how it works: in order to check that this is actually an unattended installation, subiquity will look for a user-data file (and its companion meta-data).
There are several options instructing where it checks the presence of those files:
- direct file access: when a disk (USB, CDROM or floppy (!)) with the name
CIDATAis present and contains the 2 files. This seems funny but it is actually a very simple setup that works with tools such as HashiCorppacker(see for instance the optionfloppy_contentfor VirtualBox) or even with real computers (second USB stick), - enter manually some magic parameters into GRUB: this would specify eg. a network location where to find those files,
- modify parameters of the machine itself: this technique uses what is called the
SMBIOSthat is part of DMI, and is actually very handy. We will get into this later.
We will explore the two last alternatives that do not depend on the type of virtualization in use, but (spoiler) all 3 alternatives rely on the nocloud-net data source of cloud-init.
This is how this works:
To summarize, we need 2 things:
- pass the proper boot options so that the installer looks for a network location
- have a web-server somewhere serving the files
Let's start with the second point, as this is extremely simple
cd /folder/containing/your/user-data
python3 -m http.server -b 0.0.0.0 3003
where 0.0.0.0 opens the service to the world and the 3003 is the port where the service is operating. If we see any activity on this web-server, it means that the auto-installer can talk to the web-server and we are good.
For the first bullet above, we need to instruct the auto-installer that this is actually an unattended installer with network. This is done using the following option that is passed to cloud-init:
ds=nocloud-net;s=http://IP-of-the-service:3003/
where:
dsstands for "data source": the methodnocloud-netis how theuser-datais injected (it does not require a cloud infrastructure and may access the network, contrary to justnocloudfor file accesses),sstands for "seed from": here we have andhttplocation to our service
The IP will depend on how you set-up the network for your virtual machine: you will have to do some homework and trial/error there.
Kernel command line parameters in GRUB
Before going further into more complicated things, let's first check the auto-installer can actually talk to our web-server and fetch the user-data. As mentioned above, setting this up properly will also depend on how you set up your VM network interface.
The check boils down to passing the cloud-init parameters as a kernel command line parameter. For doing so,
- boot your VM from the Ubuntu Server installation ISO
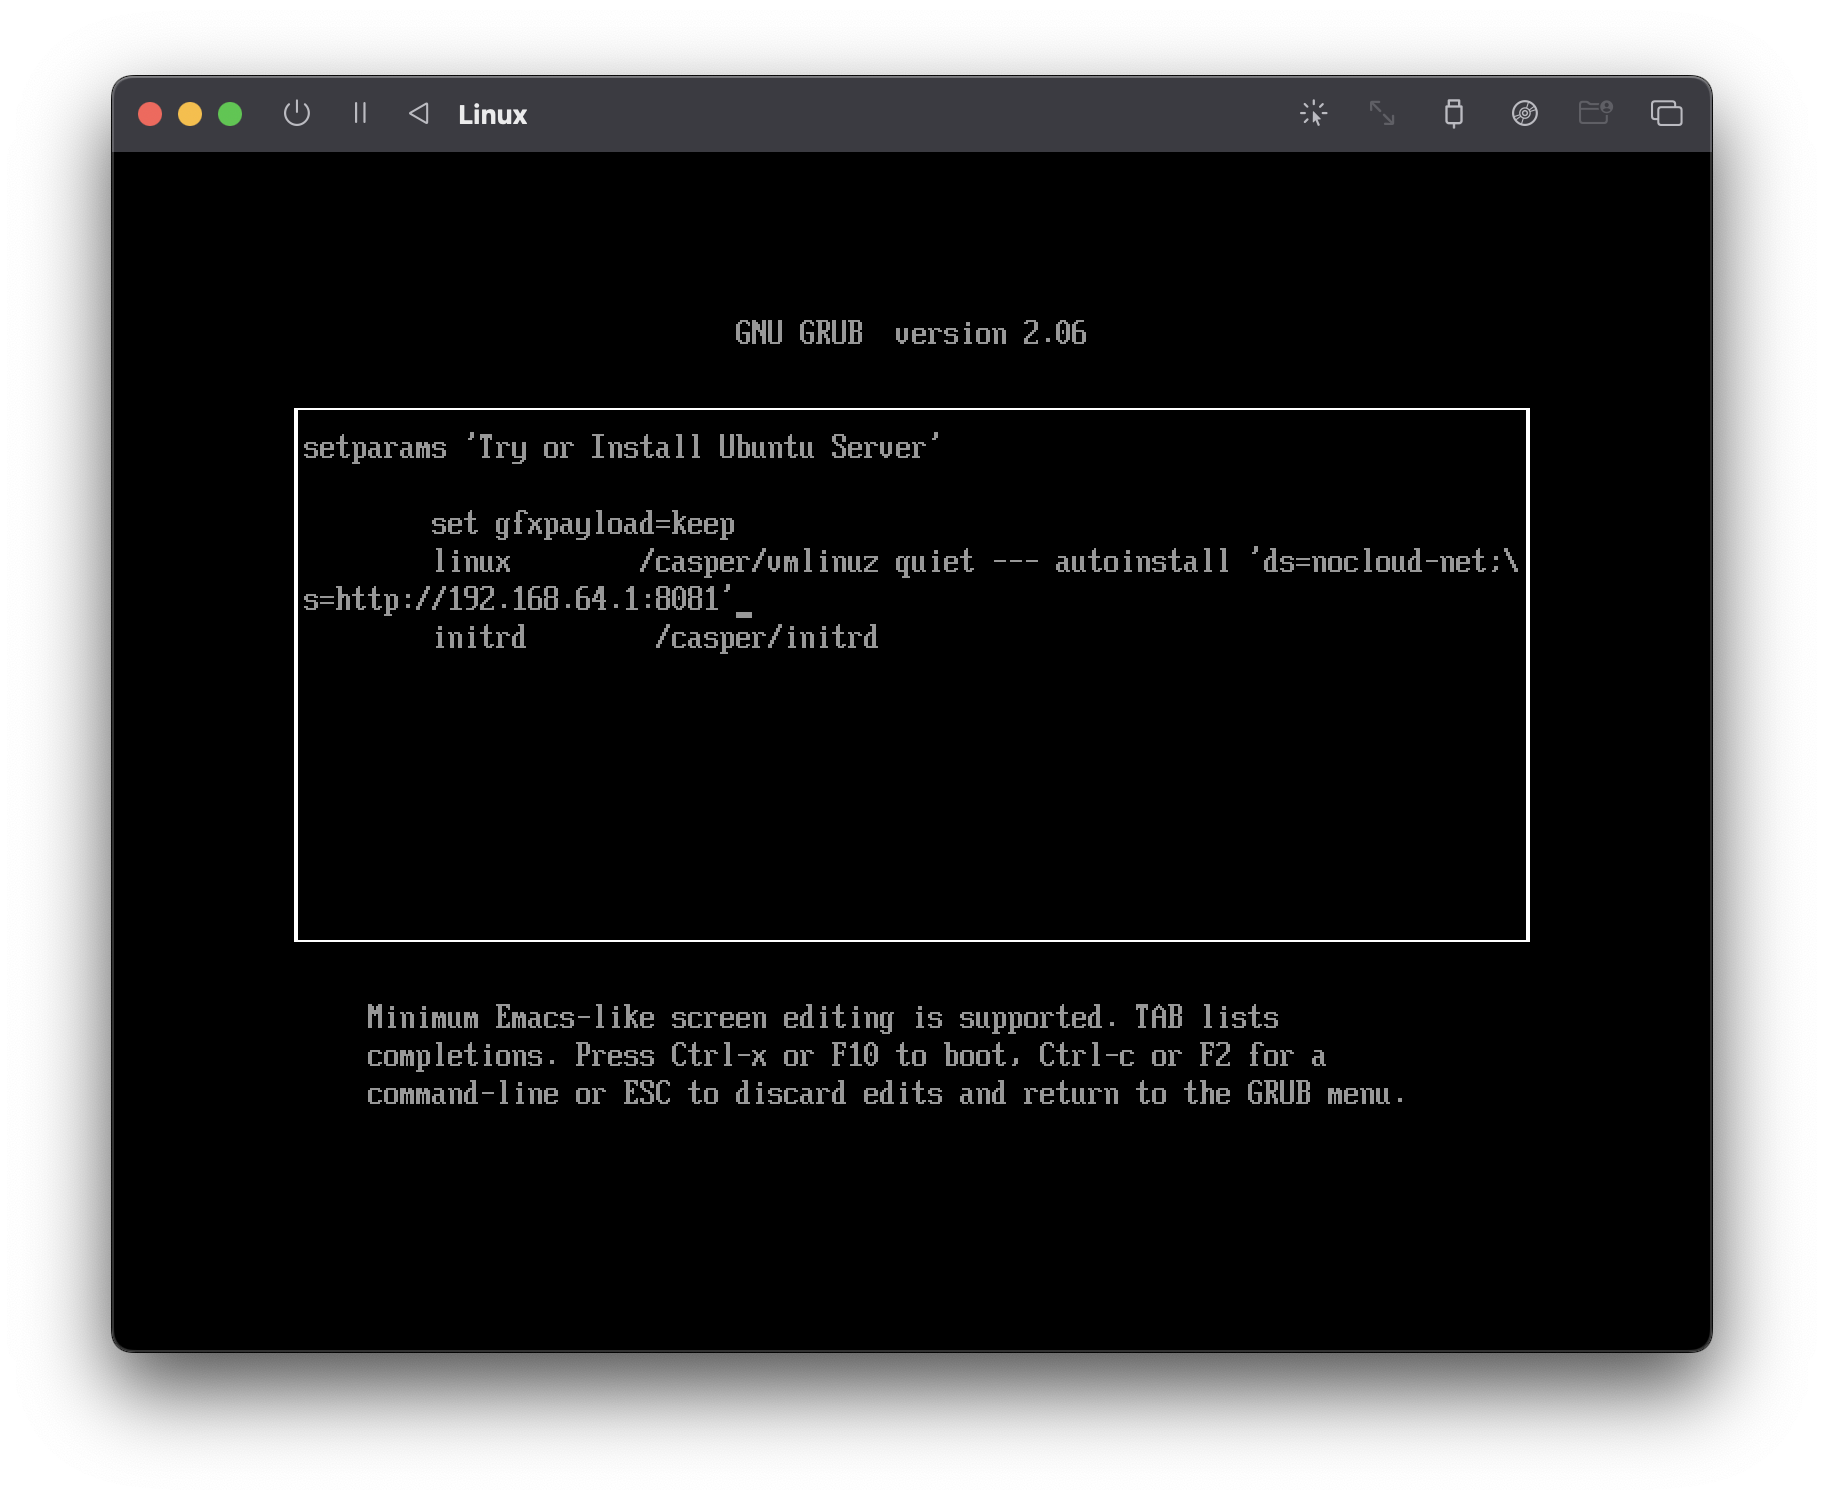
- on the initial prompt, type
eto add parameters to the kernel
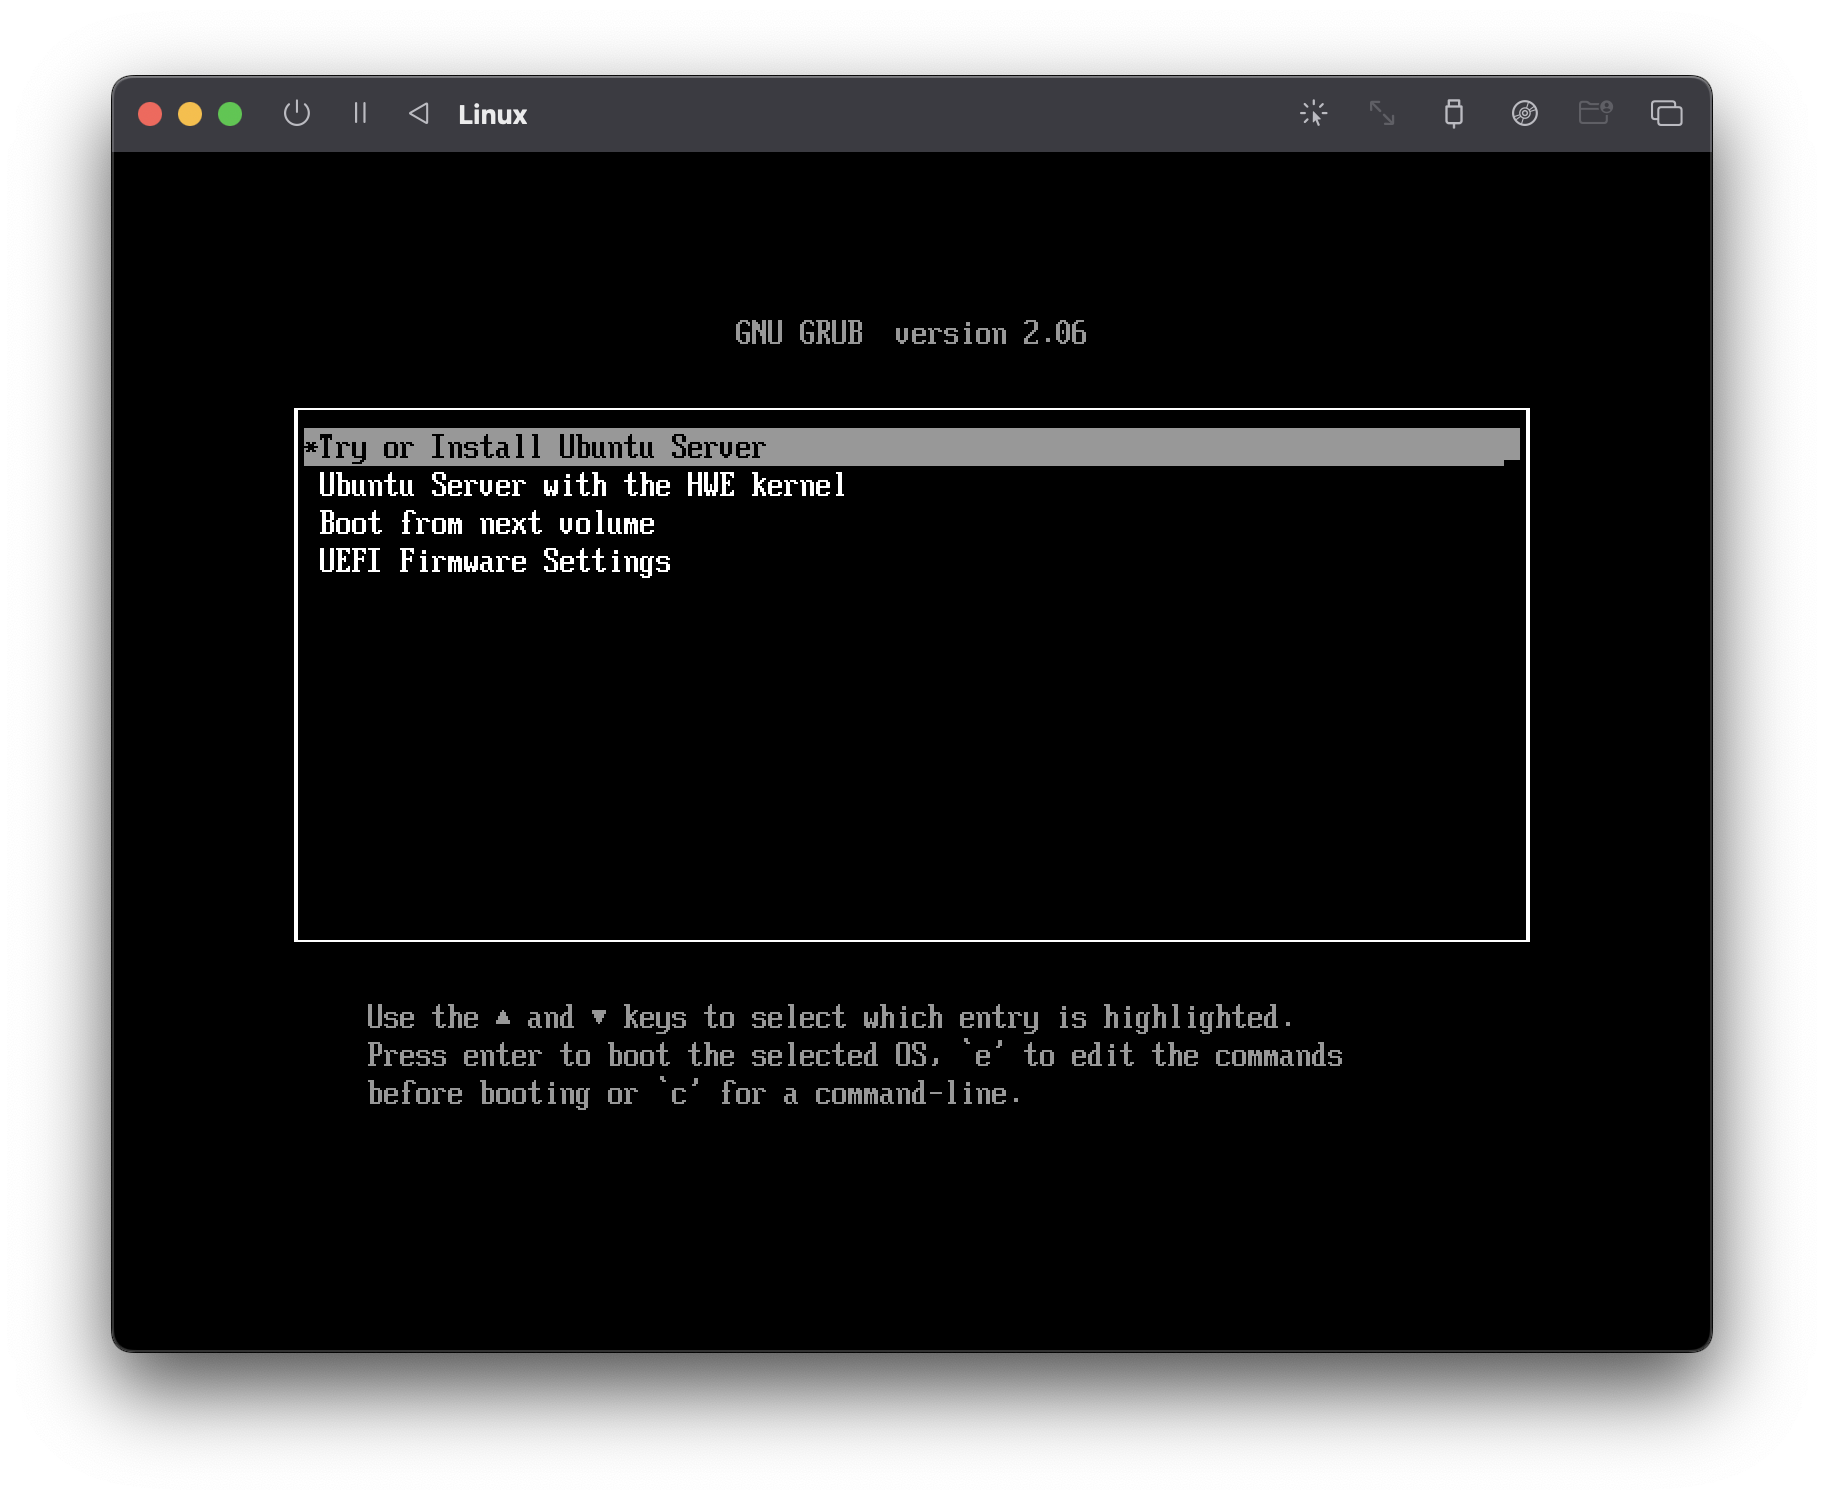
- then enter the kernel parameter as
autoinstall 'ds=nocloud-net;s=http://IP-of-the-service:3003/'(don't forget the'):
- then
<F10>: this will start the installation
If the command line is well formed, you will see activity on your web-server (and even if there is no relevant file to fetch). If this is not the case, you can drop into a shell inside the installer (top-right menu)
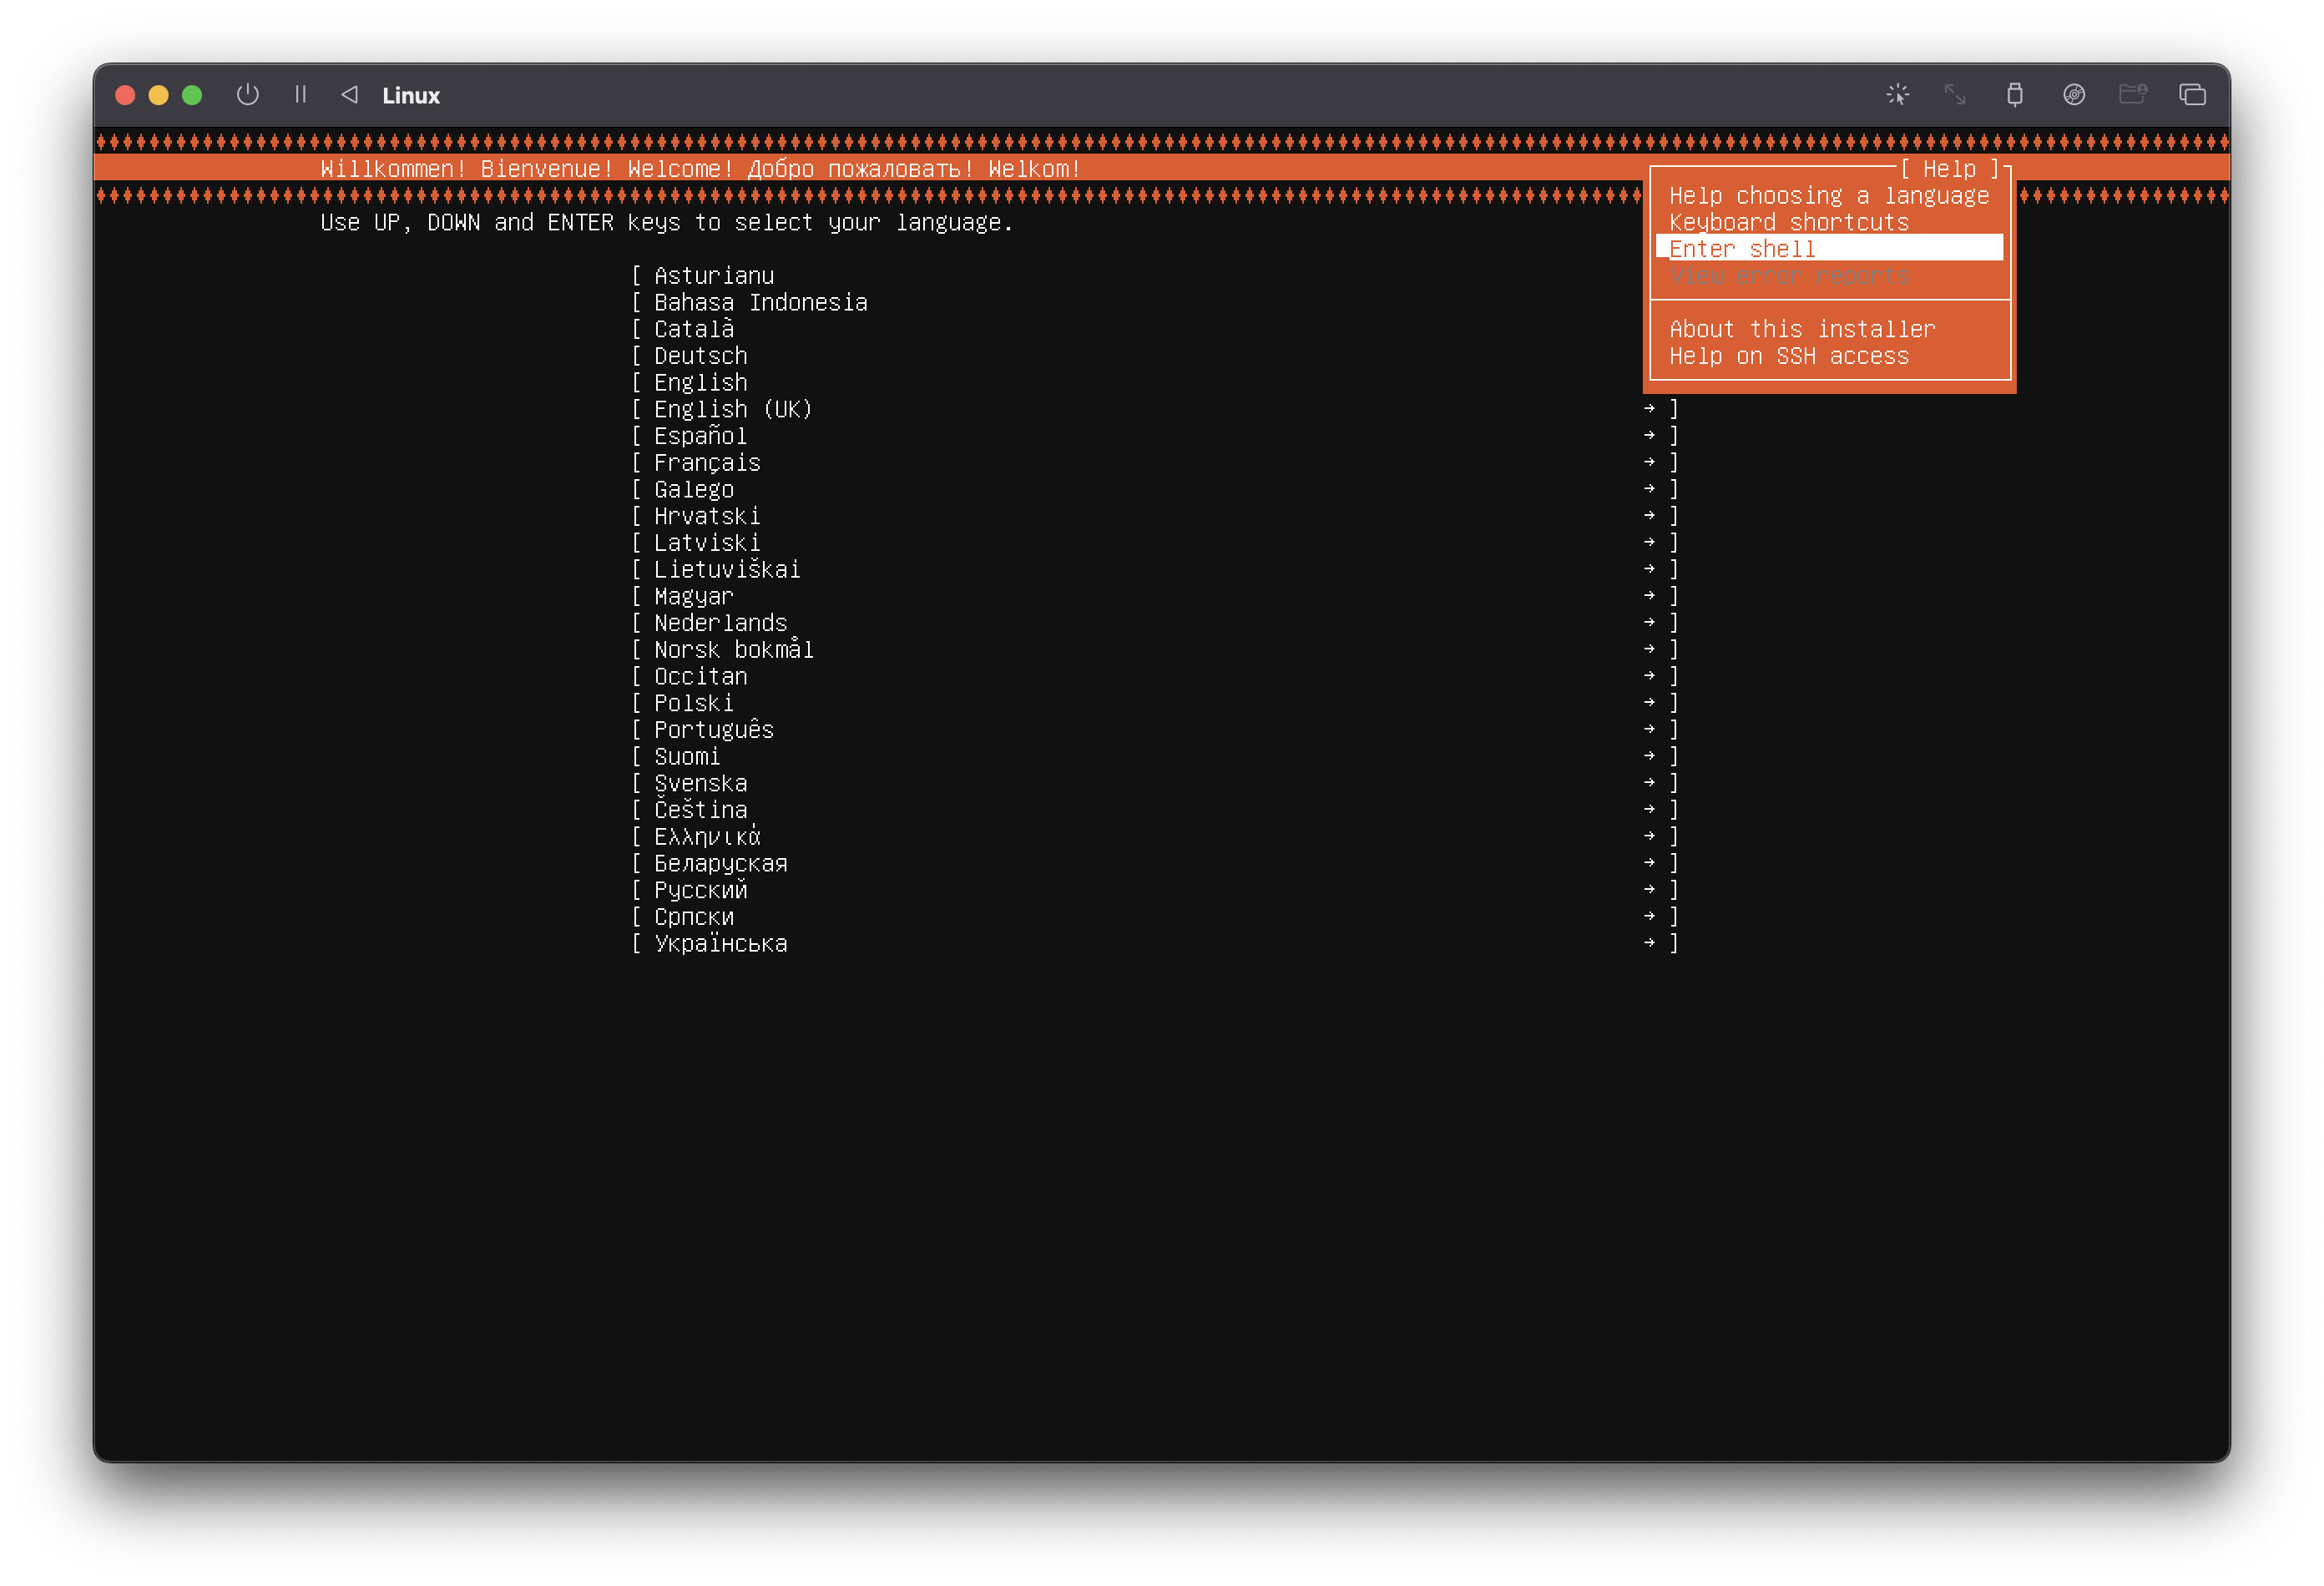
and then type some wget command from within. After a few trial/errors you should get the IP address right. On the screenshot below you can see that the correct IP address was 10.0.2.1.
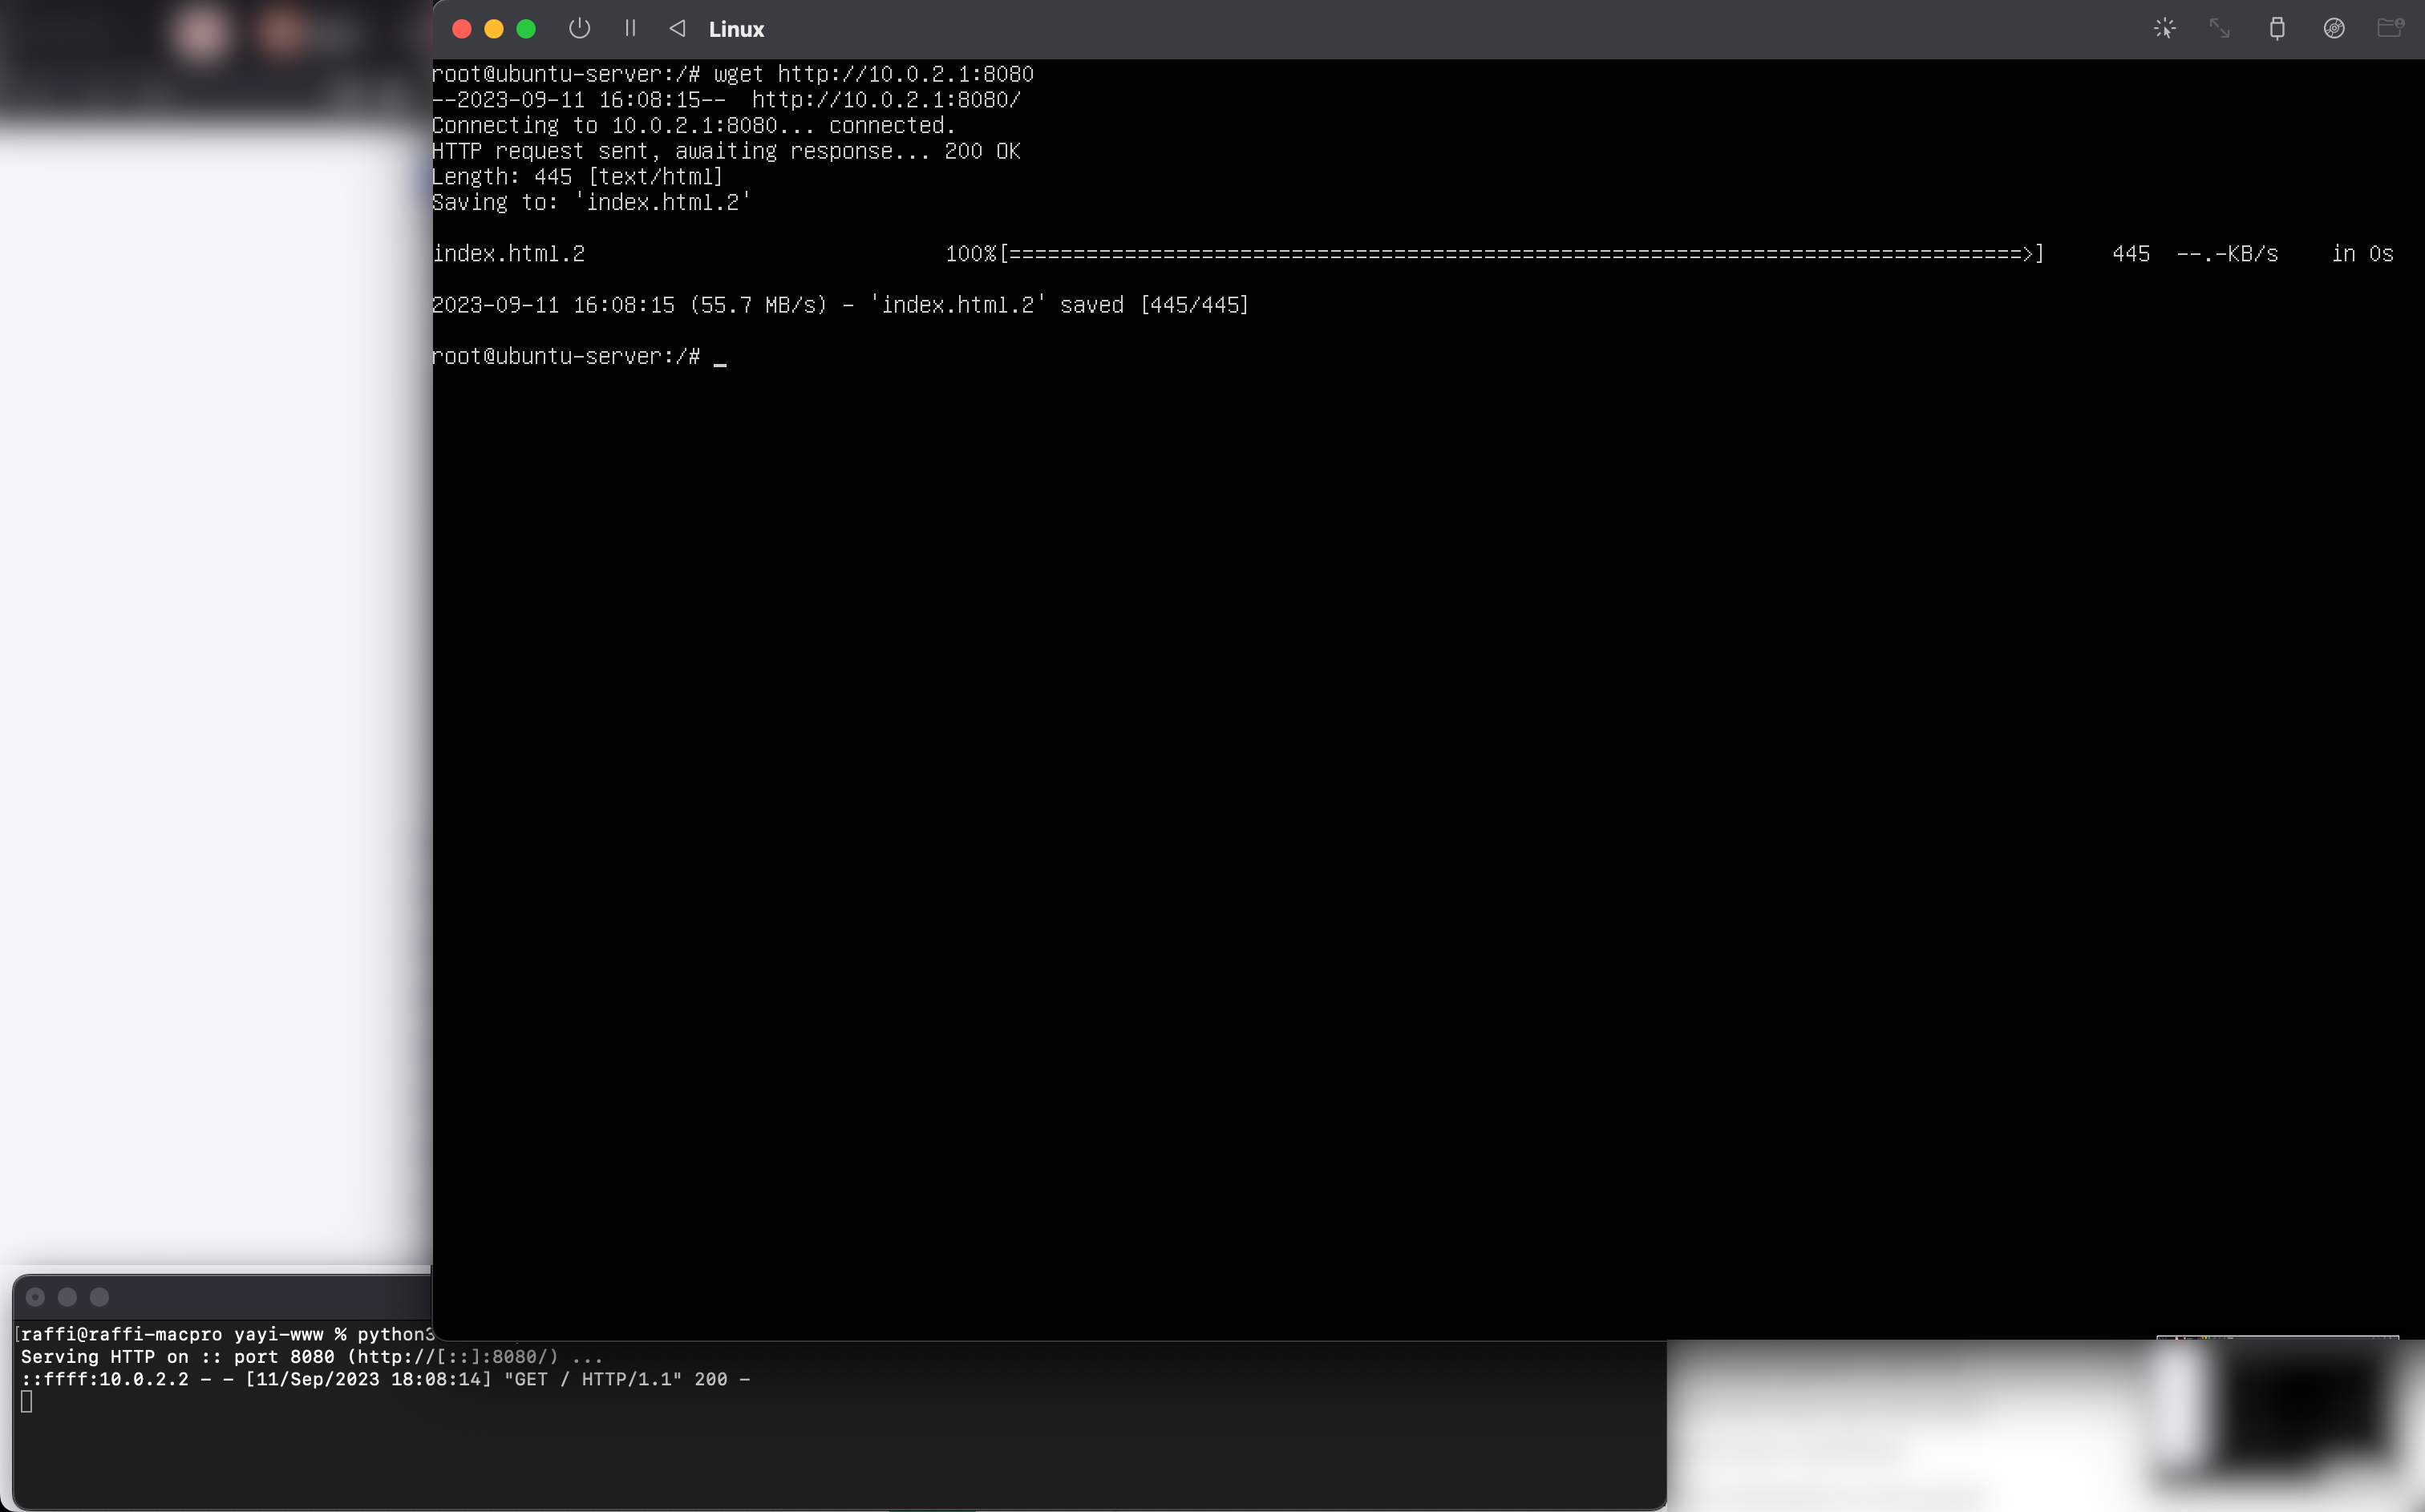
Once the IP fixed, you can go back to running the installer again with the full kernel command line.
note this method always works, whatever the Virtual Machine technology you are using, or whether the VM is configured with UEFI or not.
SMBIOS option
I consider entering the kernel command line parameters as particularly tedious as it has to be done at each boot. What if we can pass this command line directly from the VM configuration?
From cloud-init's nocloud-net data source documentation:
configuration files can be provided to cloud-init using a custom web-server at a URL dictated by kernel command line arguments or SMBIOS serial number.
Kernel command line arguments: we saw it just above, but what does SMBIOS serial number mean?
SMBIOS stands for System Management BIOS and part of its scope is to specify a mean to describe the hardware. We have through SMBIOS 1) a way to set information about the hardware (at the VM level), and 2) a way to query those specifications.
By SMBIOS serial number in the excerpt above, it means that
- we can inject the kernel command line parameter directly to the SMBIOS and this should be the specification that describes the serial number of the machine
cloud-initwill attempt to read the SMBIOS serial number and, if successful, will use it as the installation data-source.
All in all, SMBIOS is used by cloud-init as a one-directional message passing micro-system.
note here, we do not include the autoinstall and the serial number should just be ds=nocloud-net;s=http://IP-of-the-service:3003/, with the IP discovered in the previous step.
note about SMBIOS, the latest specifications (v.36) show many places where the SMBIOS serial number can be specified: the one that is used by cloud-init should be type 1 (see the command for qemu on the documentation).
How we specify the System Serial Number (SMBIOS/DNI type 1 again) is however dependent on the Virtual Machine technology.
VirtualBox
Setting the SMBIOS in VirtualBox is, as far as I know, not possible through the UI and should be done through the command line. The command for managing a VM is vboxmanage (which should come with your installation of VirtualBox) and the sub-command for manipulating various state of the VM is setextradata. To identify which extra data to set, we need to refer to the Oracle documentation for DMI / SMBIOS available here, and look for the System Serial in the DMI type 1.
If the VM is booting using BIOS, the command line is
vboxmanage \
  setextradata \
  name-of-the-vm \
  "VBoxInternal/Devices/pcbios/0/Config/DmiSystemSerial" \
  "ds=nocloud-net;s=http://IP-of-the-service:3003/"
If the VM is booting using UEFI (in the settings System > Enable EFI), one need to replace pcbios by efi for the extra data path above, which yields the following command:
vboxmanage \
  setextradata \
  name-of-the-vm \
  "VBoxInternal/Devices/efi/0/Config/DmiSystemSerial" \
  "ds=nocloud-net;s=http://IP-of-the-service:3003/"
qEMU
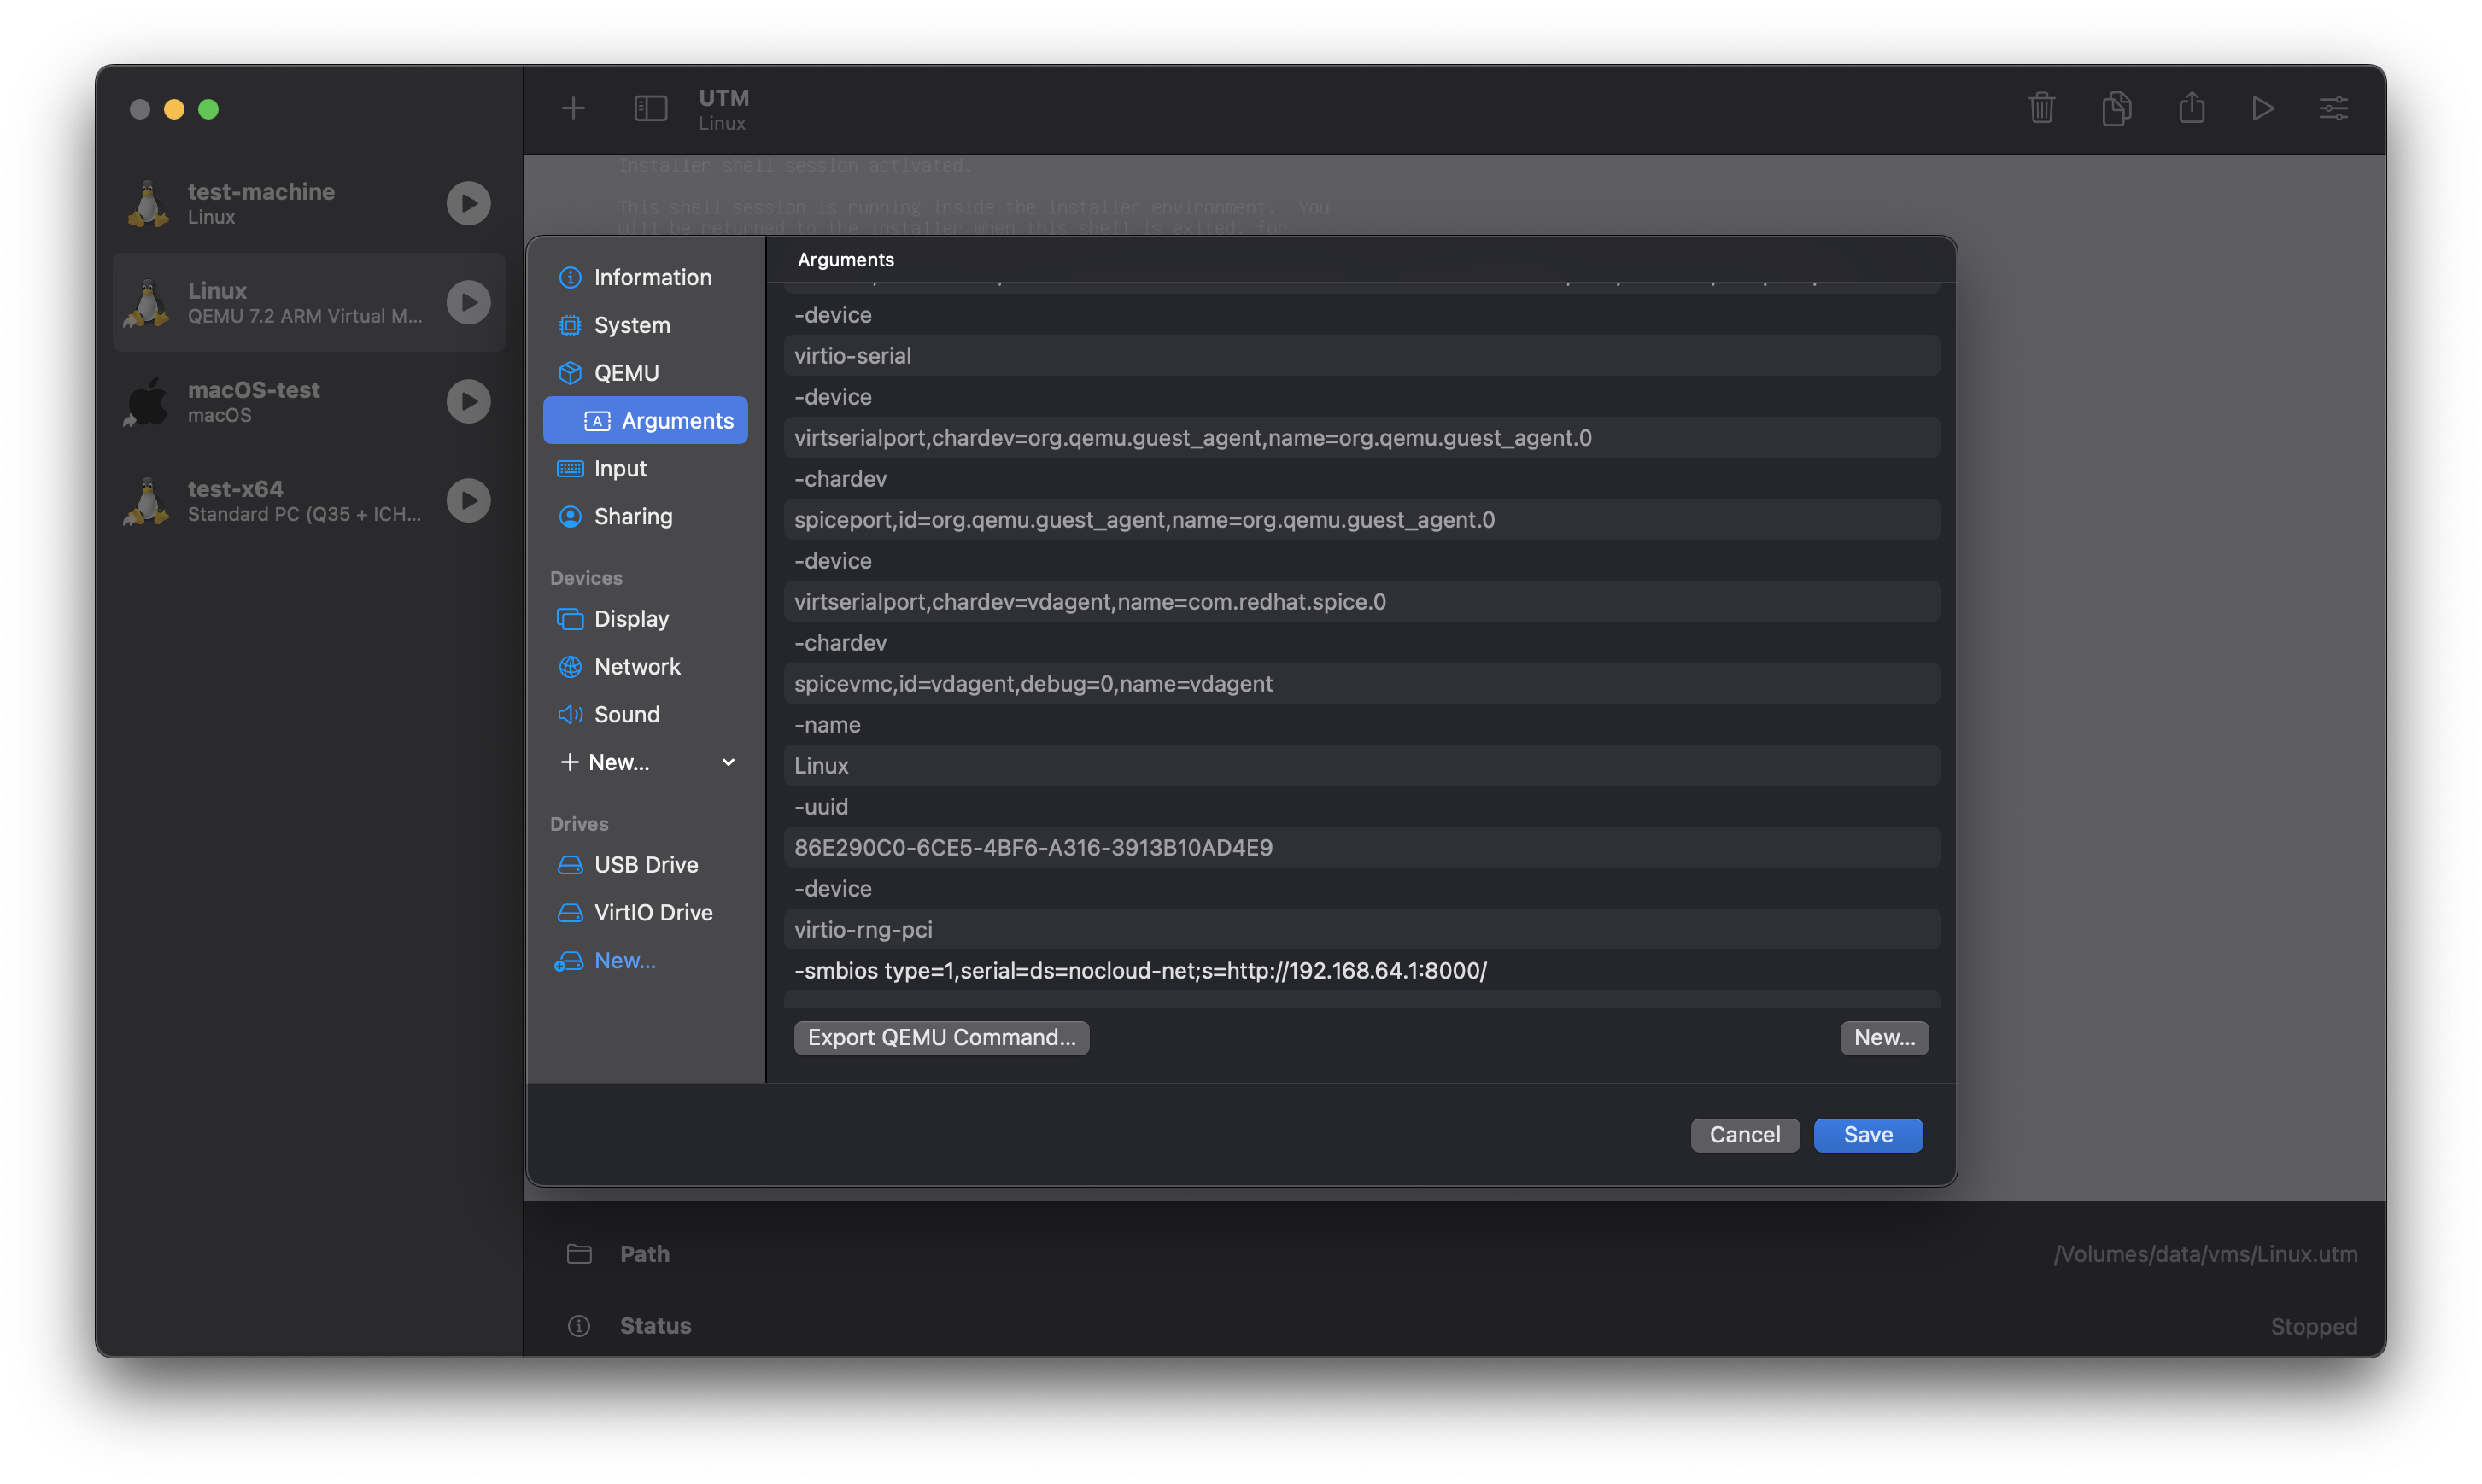
For qEMU, we simply add the following parameter to the command line of the VM:
-smbios type=1,serial=ds=nocloud-net;s=http://IP-of-the-service:3003"
For UTM, this looks like this (Settings of the VM > QEMU > Arguments):
Troubleshooting
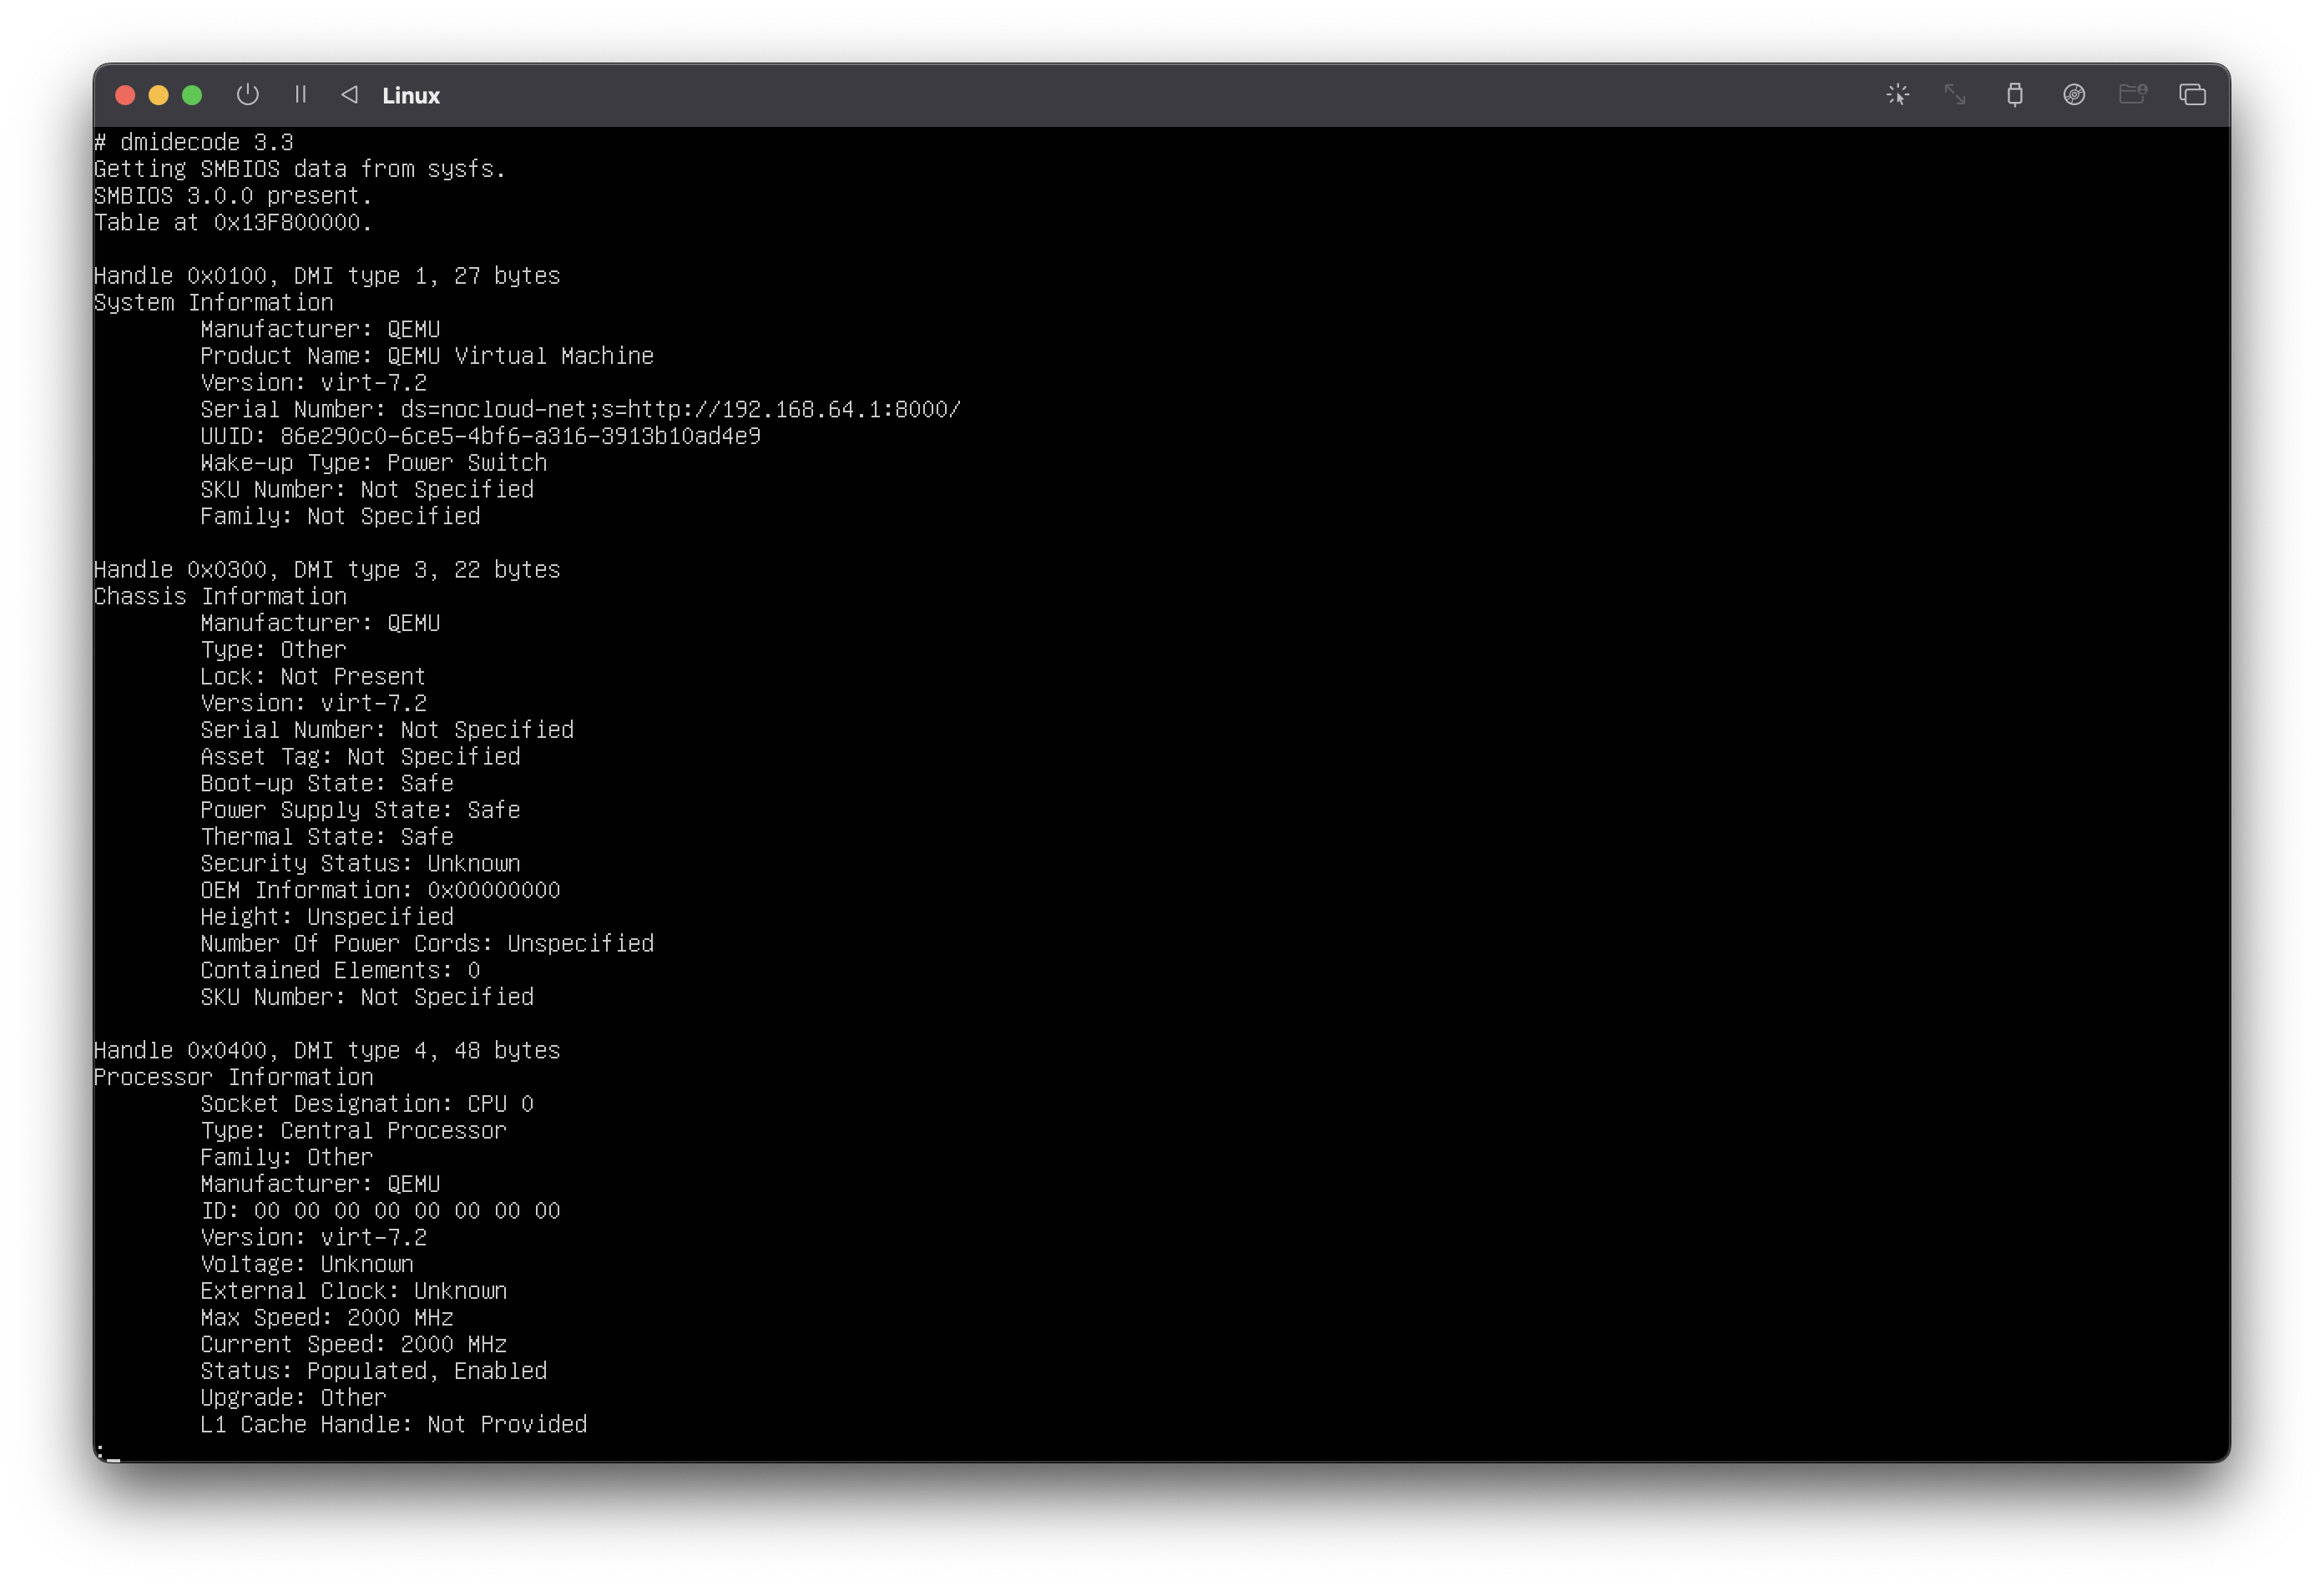
Once set, you can boot the VM and you should not be needing to type the kernel parameters anymore. If this does not work as expected (e.g. if you don't see any activity on the web-server), we can inspect what the SMBIOS actually contains during the installation.
The method is similar to debugging the web-server communication: first drop to a shell of the installer, and then use the tool dmidecode on the prompt: dmidecode inspects the DMI and SMBIOS information.
On the following picture, you clearly see the Serial Number under System Information (DMI type 1) that indicates the
What we have learned so far
Alright, this was long so far and summarizing what we have learned seems a good idea.
We did the Ubuntu auto install Hello World!
We know more or less that we can write ourself an autoinstaller for Ubuntu Server, and there is a method for making the installer perform various things that are not directly supported. We know where we can inject the behavior we need, plus now we know some of the vocabulary and the tools involved in the various aspects of the installation.
We have also set up a little development environment around a VM. This environment will let us quickly experiment the scripts we will develop and consists of a little web-server and a virtual machine engine. Moreover we can run the Ubuntu Server installer and make it such that the installer automatically fetches the files it needs for running the installation completely unattended. We covered a bit more than just applying some black magic and we actually understand part of how it works.
This is great!
Now we actually need to write the installation instructions, and this is about developing some code. During our development, we will have to run many iterations of the script, and this is where the investments above become really handy.
Program for discovering the partitions
Now that we have a proper development environment, we will run a proper "script" for creating our partitions. This script will be in python3 and will use various system installed programs such parted and lsblk to manage the partitions.
For the inpatient, the script I had working is located here: #TODO
Querying the existing partitions
For collecting the partitions configuration, we call parted on the installation disk. The call to parted extracts each partition information, including byte size, and returns an list of dictionary. It is absolutely not bullet proof, but works good enough.
You can see that it has a dry_run mode that reads the hypothetical output of parted from a file, for development purposes.
import subprocess

def retrieve_disk_info_parted(disk_name: str, dry_run: bool = True):
    """Queries 'parted' for the partition on the given disk

    If ``dry_run`` is specified, the queried information is read from the file `/tmp/parted_output.txt` (for debugging).
    Make sure the file exists and has been generated with the same command.
    """

    cmd = (
        f"parted /dev/{disk_name} unit B print --machine --script"
        if not dry_run
        else "cat /tmp/parted_output.txt"
    )
    ret = subprocess.run(
        cmd,
        shell=True,
        capture_output=True,
    )

    if ret.returncode != 0:
        raise RuntimeError(f"Error when running parted: {ret.returncode}\n{ret.stderr}")

    content = ret.stdout.decode("utf-8")
    if not content.startswith("BYT;"):
        print("Unable to understand parted returned format")
        return None

    content_parsed = []
    for disk_content in content.split("BYT;"):
        clean_content = disk_content.strip()
        if not clean_content.startswith(f"/dev/{disk_name}"):
            continue

        cleaned_lines = []
        for row in clean_content.splitlines():
            row = row.rstrip(";").strip()
            if not row:
                continue
            cleaned_lines += [row]

        reader = csv.reader(
            io.StringIO("\r\n".join(_ + ":" for _ in cleaned_lines[1:])), delimiter=":"
        )
        for row in reader:
            if not row:
                continue

            content_parsed += [
                {
                    "partition_number": int(row[0]),
                    "start": int(row[1].rstrip("B")),
                    "end": int(row[2].rstrip("B")),
                    "size": int(row[3].rstrip("B")),
                    "fs_type": row[4],
                    "name": row[5],
                    "flags": row[6],
                }
            ]

        break
    else:
        print("Disk not found!")
        return None

    return content_parsed
The following function creates a partition at the end of the current set of partitions. It requires the information dictionary returned by the previous function and pointing to the last partition. This is how parted works: it needs to be given the start of the partition being created. The size of the new partition, in bytes, can be passed: if omitted, the default -1 will make the created partition the size of free space on the disk. In case is_swap is True, and additional flag is set on the partition.
Again, this is just an example and this function will erase without any emotion an existing partition if given the wrong information.
As you can see here, we will not give the autoinstaller a set of partitions to create: we will instead create all the necessary partitions before hand and tell the autoinstaller where to install the system.
def creates_last_partition(
    disk_name: str,
    last_partition: Dict,
    dry_run: bool = True,
    is_swap: bool = False,
    partition_size_b: int = -1,
):
    """Creates a partition right after the last partition"""

    label = "ubuntu"
    fs_type = ""
    new_partition_end = -1

    if partition_size_b != -1:
        new_partition_end = f"{last_partition['end'] + 1 + partition_size_b}B" # in bytes

    if is_swap:
        label = "swap"
        fs_type = "linux-swap"

    cmd = f"parted /dev/{disk_name} mkpart {label} \"{last_partition['end'] + 1}B {new_partition_end}\" {fs_type} --script"
    if dry_run:
        cmd = f"echo {cmd}"  # for testing

    print("Running the command\n", cmd)
    ret = subprocess.run(
        cmd,
        shell=True,
        capture_output=True,
    )

    if ret.returncode != 0:
        raise RuntimeError(f"Error when running parted: {ret.returncode}\n{ret.stderr}")
Another utility function extracts the amount of RAM the computer has: this is just a fancy and old way to specify the size of the swap partition, although this is in practice not used much anymore:
import math
import os

def query_memory_size():
    """Returns the current instance memory size in GB (rounded up)."""
    return math.ceil(
        os.sysconf("SC_PAGE_SIZE") * os.sysconf("SC_PHYS_PAGES") / (1024.0**3)
    )
Building the partitions section
This is now an utility function transforming the set of partitions, created or existing, to the corresponding section in the user-data YAML file. It contains a bit of logic on how to handle the UEFI boot partition for example.
To understand better this part, we need the curtin documentation related to storage: the section is not an easy read and you will certainly have to iterate over various configurations to finally get it right.
We need now to inject into the user-data the things it doesn't know about, modify the parts that are common with the previous OS, and generate the new OS partition configuration.
First let's look at the function translating the existing partitions into the curtin compatible format:
def parted_to_storage(disk_name_id, parted_info, uefi_boot):
    """Transforms partition information to storage element suitable for autoinstall/user-data"""

    grub_partition = None
    storage = []
    for idx, partition in enumerate(parted_info):

        current = {
            "id": f"part-{idx}",
            "device": disk_name_id,
            "type": "partition",
            "number": partition["partition_number"],
            "size": f"{partition['size']}B",
            "preserve": True,
        }

        if "boot" in partition["flags"] and "esp" in partition["flags"]:
            current["flag"] = "boot"
            if uefi_boot:
                current["grub_device"] = True
                current["preserve"] = True
                current["partition_type"] = "EF00"
                grub_partition = current["id"]

        storage += [current]

    if uefi_boot:
        storage += [
            {
                "id": "efi-format",
                # format partitions on ssd0
                "type": "format",
                "volume": grub_partition,
                # ESP gets FAT32
                "fstype": "fat32",
                "label": "ESP",
                # we don't want to format anything, otherwise win boot manager gets wiped
                "preserve": True,
            },
            {
                "id": "efi-mount",  # /boot/efi gets mounted next
                "type": "mount",
                "device": "efi-format",
                "path": "/boot/efi",
            },
        ]
    return storage
It is dead simple to read but needs some explanations: the function returns a list of partitions (as far as I know the order should not matter much) in a format following curtin's storage and based on what we previously read with parted. This has the following form:
- id: part-1
  type: partition
  device: disk-sda
  number: 7
  size: 3000000
  preserve: true
You may notice:
- what makes a partition is the
type=partitionand each partition is attached to adevice(given as argument to the function). The device that we care about is the one on which we will install the system. I have not tested but I believe all other devices can be discarded from theuser-data, - the
idis just what it is: anidand it should uniquely identify the partition. It is not for instance related to anyUUIDthe drives or partitions may have, - the
sizeand thenumberare returned byparted, and they are both important to get right otherwisecurtinwill complain and fail the installation, preserve=trueensures that the structure of the partition is not modified, and this is an important control we want to keep.
You may also have noticed the handling of UEFI: we identify the partition that is supposed to be the boot partition from its partition flags in the for loop. After having looped over all existing partitions, we add now a format description and a mount point. This instructs curtin that:
- there is such a partition formatted in FAT32 (hence the
type=format, the associated partition gets its own entry as atype=partition, see the code) - the partition will be mounted on
/boot/efi(type=mount) so that curtin will be able to install the UEFI boot program there:
- id: efi-format
  type: format
  volume: $grub_partition   # variable discovered in the loop
  fstype": fat32
  label": ESP
  preserve": true

- id: efi-mount
  type: mount
  device: efi-format
  path: /boot/efi
note the function assumes there is one boot partition already (prior OS installation), and this needs to be changed to meet your needs.
Finalizing the partitions information
Up until now, we were able to describe the current partitions setup, which was what we wanted to achieve initially, but we also want to install the new OS and we need to instruct curtin on where/how to do it.
In order to give a bit of flexibility, the method will be the following:
user-datawill contain an installation template: in particular thestoragesection will only be partially filled,- the template will be merged with the actual disk/partition configuration.
The following code just serves as an example on what we can do, and you would need to adapt it to your needs. We start by reading the configuration and populate the information from parted:
# read the autoinstall file (our user-data)
auto_install_filename = "/autoinstall.yaml"
# read initial configuration
with open(auto_install_filename) as f:
    content = f.read()
content = yaml.load(content, Loader=yaml.CLoader)

# pointer to the relevant section
storage = content["storage"]["config"]

# the target physical disk where we will install
disk_name_id = f"disk-{disk_name}"

# retrieves the partition info and transforms it to curtin storage information
disk_info_parted = retrieve_disk_info_parted(disk_name=disk_name, dry_run=dry_run)
if disk_info_parted is None:
    raise RuntimeError(f"Unable to detect the partitions for disk {disk_name}")

storage_dynamic = parted_to_storage(
    disk_name_id=disk_name_id, parted_info=disk_info_parted, uefi_boot=uefi
)
If we are in UEFI mode, the target disk grub_device should be removed (in case our configuration contains it):
# for UEFI we remove the grub_device from the disk
if uefi:
    disk_storage = [_ for _ in storage if _["id"] == disk_name_id]
    if not disk_storage:
        raise RuntimeError(
            "Cannot found the storage element associated to the disk"
        )
    disk_storage = disk_storage[0]
    if "grub_device" in disk_storage:
        disk_storage.pop("grub_device")
We now add the discovered partitions to the configuration we need. You can see that the device is included in the user-data.in but is not returned by the function parted_to_storage.
# fills in the actual configuration
storage += storage_dynamic

# selects the last partition after which we will add our installation partition
last_partition = sorted(
    disk_info_parted, reverse=True, key=lambda x: x["partition_number"]
)[0]
The variable last_partition points to the actual existing last partition on the disk with id=f{disk_name_id}. In case we need the swap partition, we search for a volume with id=ubuntu-swap from our template:
- we create physically the partition: this will commit the changes immediately to disk
- we re-read the partitions as
partedmay have aligned the partitions to some boundaries/sectors for efficiency purposes. The created partition is still the last one, - we fill the blanks in the template from the last partition, in particular the partition
numberandsize
# first create the swap partition
if with_swap:
    target_volume_id_swap = "ubuntu-swap"
    swap_partition_size_b = query_memory_size() * (1024**3)
    creates_last_partition(
        disk_name=disk_name,
        last_partition=last_partition,
        dry_run=dry_run,
        is_swap=True,
        partition_size_b=swap_partition_size_b,
    )

    target_storage_element_swap = [
        _ for _ in storage if _["id"] == target_volume_id_swap
    ]
    if not target_storage_element_swap:
        raise RuntimeError(
            "Cannot find the target storage element for swap in the YAML"
        )

    target_storage_element_swap = target_storage_element_swap[0]

    # see below
    disk_info_parted = retrieve_disk_info_parted(
        disk_name=disk_name, dry_run=dry_run
    )
    created_partition = sorted(
        disk_info_parted, reverse=True, key=lambda x: x["partition_number"]
    )[0]
    target_storage_element_swap["number"] = created_partition["partition_number"]
    # we reread the actual partition size because of alignment logic that is hard to predict.
    target_storage_element_swap["size"] = f'{created_partition["size"]}B'

    # update last partition
    last_partition = sorted(
        disk_info_parted, reverse=True, key=lambda x: x["partition_number"]
    )[0]
We do exactly the same for the installation partition, except that now the partition we are looking for is identified by "ubuntu-install" in our template. We don't pass the partition size to creates_last_partition: the size then takes the default value -1 and fills up the disk until its end. We then re-read the partitions configuration again (we cannot pass -1 to curtin if we want to keep that partition with preserve=True) and inject it to the corresponding partition information in the storage section:
# the installation partition
target_volume_id = "ubuntu-install"

creates_last_partition(
    disk_name=disk_name, last_partition=last_partition, dry_run=dry_run
)

# reread the partitions to extract last partition size
disk_info_parted = retrieve_disk_info_parted(disk_name=disk_name, dry_run=dry_run)
created_partition = sorted(
    disk_info_parted, reverse=True, key=lambda x: x["partition_number"]
)[0]

target_storage_element = [_ for _ in storage if _["id"] == target_volume_id]
if not target_storage_element:
    raise RuntimeError("Cannot find the target storage element in the YAML")

target_storage_element = target_storage_element[0]
target_storage_element["number"] = created_partition["partition_number"]
# "size": -1 yields the error "size must be specified for partition to be created"
target_storage_element["size"] = f'{created_partition["size"]}B'
We finish the script by writing back the modified user-data to disk:
print(f"Generating the autoinstall file {auto_install_filename}")
with open(auto_install_filename, "w") as f:
    f.write("#cloud-config\n")
    f.write(yaml.dump(content))
As you see above, we don't let curtin modify the partitions' configurations by flagging them all with preserve=true.
Why a template in the first place?
We need to identify the partitions where we want to install: we want for instance
- to create a swap partition that relates to the amount of RAM installed on the machine (this is a function),
- to assign the remaining space on the disk to the installation (this is a function again)
However, we do not want to specify if we want an LVM partition for Ubuntu, what are the VGs, mount points etc and this should be done in the template. This gives a nice touch of modularity without touching the script.
An example of template demonstrating what I have in mind is given below:
#cloud-config
autoinstall:
  version: 1
  # ... omitted ...
  storage:
    version: 2
    config:
      - id: disk-sda
        type: disk
        ptable: gpt
        # match:
        #  ssd: yes
        #  size: largest
        preserve: true

      - id: ubuntu-swap  # shared w. script
        type: partition
        device: disk-sda
        number: 0           # will be replaced by the script
        size: 0             # will be replaced by the script
        preserve: true

      - id: ubuntu-install  # shared w. script
        type: partition
        device: disk-sda
        number: 0           # will be replaced by the script
        size: 0             # will be replaced by the script
        preserve: true

      # ubuntu installation volume and mount
      - id: root_fs
        type: format
        volume: ubuntu-install
        name: ubuntu
        fstype: ext4

      - id: root_mount
        type: mount
        device: root_fs
        path: /

      # swap partition
      - id: swap_part
        type: format
        volume: ubuntu-swap
        name: linux-swap
        fstype: swap

      - id: swap_mount
        type: mount
        path: swap
        device: swap_part
UEFI vs BIOS
There are many resources discussing the differences between BIOS mode and UEFI. To cut short, when you are booting your computer in UEFI, you need a special partition containing the microprogram that will load the OS. This partition should be FAT32 and should have flags set so that the computer identifies the correct partition.
When you install Windows and clear the disk, the UEFI partition is automatically created: the Ubuntu installer should detect it and instruct Ubuntu that it is mounted on a particular mount point.
Generating the YAML from source file
Here I introduce again a little utility that turns out to be quite effective and handy: a function that injects the content of the python script into user-data automatically.
The user-data becomes now an user-data.in and the early-commands look like this:
  early-commands:
    - |
      cat <<EOF | tee /tmp/partitioning.py
      # partitioning.py automation

      # end automation
      EOF

    - python3 /tmp/partitioning.py --uefi --swap-partition --install
    - echo "Finished early commands"
The code for generating a new YAML file from user-data.in is simply something like the following, where we just need to be careful to keep the #cloud-config on the first line:
from pathlib import Path

import yaml


def deploy():
    """Injects this script into the user-data.in yaml file as early-command"""
    current_file = Path(__file__)
    with current_file.open() as f:
        script_content = f.read()

    with (current_file.parent / "user-data.in").open() as f:
        yaml_content = yaml.load(f.read(), Loader=yaml.CLoader)

    early_commands = yaml_content["autoinstall"]["early-commands"]

    found_command = None
    found_command_end = None
    for idx_cmd, command in enumerate(early_commands):
        for idx, first_lines in enumerate(command.splitlines()[:3]):
            if (
                re.match(f"#\\s+{current_file.name}\\s+automation", first_lines)
                is not None
            ):
                found_command = "\n".join(command.splitlines()[: idx + 1])
                found_command_end = "\n".join(command.splitlines()[-2:])
                break

        if found_command:
            break
    else:
        raise RuntimeError("Cannot find the script placeholder")

    found_command += "\n" + script_content + found_command_end
    early_commands[idx_cmd] = found_command

    with (current_file.parent / "user-data").open("w") as f:
        f.write("#cloud-config\n")
        f.write(yaml.dump(yaml_content))
We finally branch that to a command line parameter:
if __name__ == "__main__":
    parser = argparse.ArgumentParser(
        description="Partitioning helper for unattended ubuntu server installation through autoinstall"
    )

    # ...
        parser.add_argument(
        "--install",
        action="store_true",
        help="if set, runs the actual commands, otherwise runs in dry-run model (default).",
    )

    arg_dict = vars(parser.parse_args())

    if arg_dict["deploy"]:
        deploy()
and voilà. Just run partition.py --deploy and it generates a valid user-data by injecting itself into the right location. No additional dependencies except the ones that we have already at our disposal.
note the content of the YAML file is accessed under the key autoinstall while in the partitioning script we are using the content from the YAML file directly. It seems this is how the user-data is written to disk after being pulled by cloud-init, but I haven't found any documentation on this.
Conclusion
I am convinced that once one understands well the pieces, everything gets clear and easy. This is the reasoning behind making this article as detailed as possible, while staying at the human detail level.
The journey was a bit long, but we learned things that, I'm sure, will be useful in other contexts. Besides, we can adapt the Ubuntu autoinstaller to our needs without any external or fancy tools: the autoinstaller performs now tasks it couldn't do.
We spent also a bit of time on the vocabulary and pointers to the involved frameworks/tools: having a common understanding of the ecosystem is important.
Finally, we created a development environment around VMs and pushed the automation as much as possible.
The scripts given here are just examples that can be adapted to your needs, they by the way contain some caveat: there is for instance no atomicity of the operations we are performing and this is by design. If something fails in the middle of the script, the partitioning of the device would have certainly be modified. This is by design: the early-commands provide a yes/no to the installer, but the installer is not aware of the operations and no roll-back is possible. The current procedure is also not idempotent: stopping the installation in the middle and booting again on the installer will not work. Again, by design.
I hope you enjoyed the (rather fat) read or at least part of it, and you are now ready to do unattended dual boot installations or develop installation scripts in a virtual machine. Your feedback is more than welcome, you can reach me by email by checking my GPG key.
Vocabulary and references
- subiquity: the tool in charge of installing Ubuntu server
- curtin: an OS installer, basically coming with a descriptive language for installing/configuring the installation of an OS.
- cloud-init: a provisioning system/facility, largely used for eg. cloud provisioning OS images
- DTMF (Distributed Management Task Force): the organization producing SMBIOS specifications.
